

代码拉取完成,页面将自动刷新
| title | keywords | description | ||||
|---|---|---|---|---|---|---|
openid-connect |
|
This document contains information about the Apache APISIX openid-connect Plugin. |
The openid-connect Plugin provides authentication and introspection capability to APISIX with OpenID Connect.
| Name | Type | Required | Default | Valid values | Description |
|---|---|---|---|---|---|
| client_id | string | True | OAuth client ID. | ||
| client_secret | string | True | OAuth client secret. | ||
| discovery | string | True | Discovery endpoint URL of the identity server. | ||
| scope | string | False | "openid" | Scope used for authentication. | |
| realm | string | False | "apisix" | Realm used for authentication. | |
| bearer_only | boolean | False | false | When set to true, the Plugin will check for if the authorization header in the request matches a bearer token. | |
| logout_path | string | False | "/logout" | Path for logging out. | |
| post_logout_redirect_uri | string | False | URL to redirect to after logging out. | ||
| redirect_uri | string | False | "ngx.var.request_uri" | URI to which the identity provider redirects back to. | |
| timeout | integer | False | 3 | [1,...] | Request timeout time in seconds. |
| ssl_verify | boolean | False | false | When set to true, verifies the identity provider's SSL certificates. | |
| introspection_endpoint | string | False | URL of the token verification endpoint of the identity server. | ||
| introspection_endpoint_auth_method | string | False | "client_secret_basic" | Authentication method name for token introspection. | |
| public_key | string | False | Public key to verify the token. | ||
| use_jwks | boolean | False | When set to true, uses the JWKS endpoint of the identity server to verify the token. | ||
| token_signing_alg_values_expected | string | False | Algorithm used for signing the authentication token. | ||
| set_access_token_header | boolean | False | true | When set to true, sets the access token in a request header. | |
| access_token_in_authorization_header | boolean | False | false | When set to true, sets the access token in the Authorization header. Otherwise, set the X-Access-Token header. |
|
| set_id_token_header | boolean | False | true | When set to true and the ID token is available, sets the ID token in the X-ID-Token request header. |
|
| set_userinfo_header | boolean | False | true | When set to true and the UserInfo object is available, sets it in the X-Userinfo request header. |
The openid-connect Plugin offers three modes of operation:
The Plugin can be configured to just validate an access token that is expected to be present in a request header. In such cases, requests without a token or with an invalid token are rejected. This requires the bearer_only attribute to be set to true and either introspection_endpoint or public_key attribute to be configured. This mode of operation can be used for service-to-service communication where the requester can reasonably be expected to obtain and manage a valid token by itself.
The Plugin can be configured to authenticate requests without a valid token against an identity provider through OIDC authorization. The Plugin then acts as an OIDC Relying Party. In such cases, after successful authentication, the Plugin obtains and manages an access token in a session cookie. Subsequent requests that contain the cookie will use the access token. This requires the bearer_only attribute to be set to false. This mode of operation can be used to support cases where the client or the requester is a human interacting through a web browser.
The Plugin can also be configured to support both the scenarios by setting bearer_only to false and also configuring either the introspection_endpoint or public_key attribute. In such cases, introspection of an existing token from a request header takes precedence over the Relying Party flow. That is, if a request contains an invalid token, it will be rejected without redirecting to the ID provider to obtain a valid token.
The method used to authenticate a request also affects the headers that can be enforced on the request before sending it to an Upstream service. You can learn more about this on the sections below.
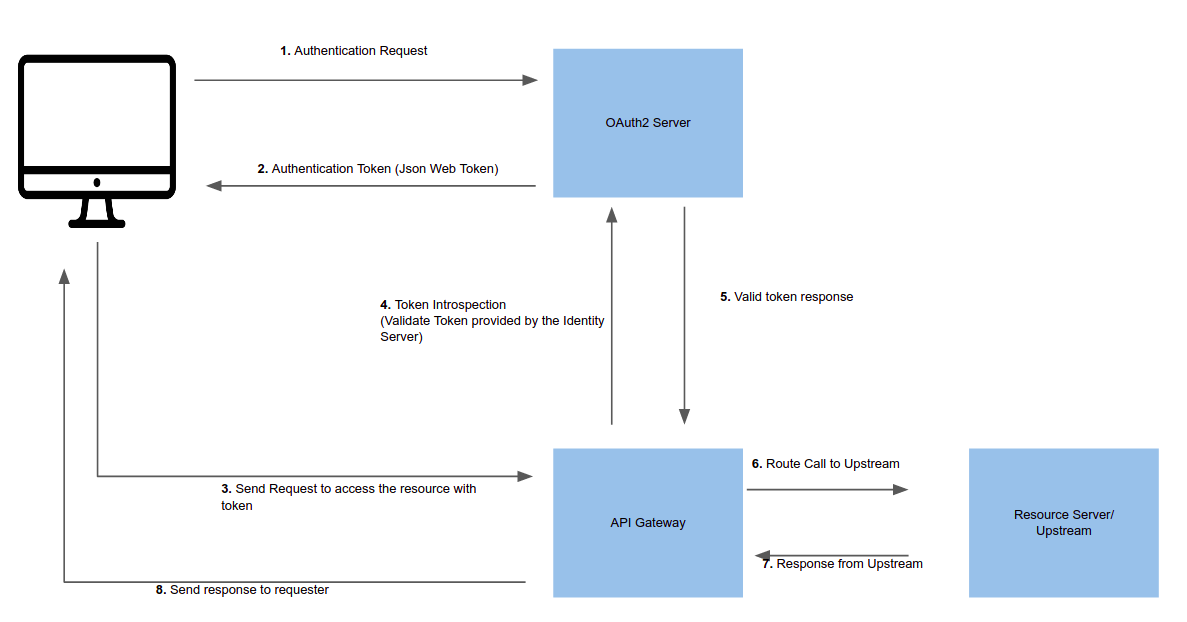
Token introspection validates a request by verifying the token with an OAuth 2 authorization server.
You should first create a trusted client in the identity server and generate a valid JWT token for introspection.
The image below shows an example token introspection flow via a Gateway:
The example below shows how you can enable the Plugin on Route. The Rouet below will protect the Upstream by introspecting the token provided in the request header:
curl http://127.0.0.1:9080/apisix/admin/routes/5 -H 'X-API-KEY: edd1c9f034335f136f87ad84b625c8f1' -X PUT -d '
{
  "uri": "/get",
  "plugins": {
    "proxy-rewrite": {
      "scheme": "https"
    },
    "openid-connect": {
      "client_id": "api_six_client_id",
      "client_secret": "client_secret_code",
      "discovery": "full_URL_of_the_discovery_endpoint",
      "introspection_endpoint": "full_URL_of_introspection_endpoint",
      "bearer_only": true,
      "realm": "master",
      "introspection_endpoint_auth_method": "client_secret_basic"
    }
  },
  "upstream": {
    "type": "roundrobin",
    "nodes": {
      "httpbin.org:443": 1
    }
  }
}'
Now, to access the Route:
curl -i -X GET http://127.0.0.1:9080/get -H "Host: httpbin.org" -H "Authorization: Bearer {replace_jwt_token}"
In this example, the Plugin enforces that the access token and the Userinfo object be set in the request headers.
When the OAuth 2 authorization server returns an expire time with the token, it is cached in APISIX until expiry. For more details, read:
exp field in the RFC's Introspection Response section.You can also provide the public key of the JWT token for verification. If you have provided a public key and a token introspection endpoint, the public key workflow will be executed instead of verification through an identity server. This is useful if you want to reduce network calls and speedup the process.
The example below shows how you can add public key introspection to a Route:
curl http://127.0.0.1:9080/apisix/admin/routes/5 -H 'X-API-KEY: edd1c9f034335f136f87ad84b625c8f1' -X PUT -d '
{
  "uri": "/get",
  "plugins": {
    "proxy-rewrite": {
      "scheme": "https"
    },
    "openid-connect": {
      "client_id": "api_six_client_id",
      "client_secret": "client_secret_code",
      "discovery": "full_URL_of_the_discovery_endpoint",
      "bearer_only": true,
      "realm": "master",
      "token_signing_alg_values_expected": "RS256",
      "public_key" : "-----BEGIN PUBLIC KEY-----
        {public_key}
        -----END PUBLIC KEY-----"
}
  },
  "upstream": {
    "type": "roundrobin",
    "nodes": {
      "httpbin.org:443": 1
    }
  }
}'
In this example, the Plugin can only enforce that the access token should be set in the request headers.
When an incoming request does not contain an access token in its header nor in an appropriate session cookie, the Plugin can act as an OIDC Relying Party and redirect to the authorization endpoint of the identity provider to go through the OIDC authorization code flow.
Once the user has authenticated with the identity provider, the Plugin will obtain and manage the access token and further interaction with the identity provider. The access token will be stored in a session cookie.
The example below adds the Plugin with this mode of operation to the Route:
curl http://127.0.0.1:9080/apisix/admin/routes/5 -H 'X-API-KEY: edd1c9f034335f136f87ad84b625c8f1' -X PUT -d '
{
  "uri": "/get",
  "plugins": {
    "proxy-rewrite": {
      "scheme": "https"
    },
    "openid-connect": {
      "client_id": "api_six_client_id",
      "client_secret": "client_secret_code",
      "discovery": "full_URL_of_the_discovery_endpoint",
      "bearer_only": false,
      "realm": "master"
}
  },
  "upstream": {
    "type": "roundrobin",
    "nodes": {
      "httpbin.org:443": 1
    }
  }
}'
In this example, the Plugin can enforce that the access token, the ID token, and the UserInfo object to be set in the request headers.
If APISIX cannot resolve/connect to the identity provider, check/modify the DNS settings in your configuration file (conf/config.yaml).
此处可能存在不合适展示的内容,页面不予展示。您可通过相关编辑功能自查并修改。
如您确认内容无涉及 不当用语 / 纯广告导流 / 暴力 / 低俗色情 / 侵权 / 盗版 / 虚假 / 无价值内容或违法国家有关法律法规的内容,可点击提交进行申诉,我们将尽快为您处理。


