2 Star 1 Fork 1

huaxiu / esp-rfid

加入 Gitee
与超过 1200万 开发者一起发现、参与优秀开源项目,私有仓库也完全免费 :)
免费加入
克隆/下载
贡献代码
同步代码
取消
提示: 由于 Git 不支持空文件夾,创建文件夹后会生成空的 .keep 文件
Loading...
README
MIT

ESP RFID - Access Control with ESP8266, RC522 PN532 Wiegand RDM6300

Chat at https://gitter.im/esp-rfid/Lobby Build Status Codacy Badge BCH compliance Bountysource

Access Control system using a cheap MFRC522, PN532 RFID, RDM6300 readers or Wiegand RFID readers and Espressif's ESP8266 Microcontroller.

See Demo Here

Showcase GifBoard

Features

For Users

  • Minimal effort for setting up your Access Control system, just flash and everything can be configured via Web UI
  • Capable of managing up to 1.000 Users (even more is possible)
  • Great for Maker Spaces, Labs, Schools, etc
  • Cheap to build and easy to maintain

For Tinkerers

  • Open Source (minimum amount of hardcoded variable, this means more freedom)
  • Using WebSocket protocol to exchange data between Hardware and Web Browser
  • Data is encoded as JSON object
  • Records are Timestamped (Time synced from a NTP Server)
  • MQTT enabled
  • Bootstrap, jQuery, FooTables for beautiful Web Pages for both Mobile and Desktop Screens
  • Thanks to ESPAsyncWebServer Library communication is Asynchronous

Official Hardware

  • Small size form factor, sometimes it is possible to glue it into existing readers.
  • Single power source to power 12V/2A powers ESP12 module, RFID Wiegand Reader and magnetic lock for opening doors.
  • Exposed programming pins for ESP8266
  • Regarding hardware design, you get multiple possible setup options:
  • Forward Bell ringing on reader to MCU or pass it out of board
  • Track Door Status
  • Control reader’s status LED
  • Control reader’s status BUZZER sound *
  • Power reader, lock and the board through single 12V, 2A PSU
  • Optionally power magnetic lock through external AC/DC PSU
  • Possible to use any kind and any type of Wiegand readers
  • Enables you to make IOT Access System with very little wiring
  • Fits in an universal enclosures with DIN mount
  • Open Source Hardware

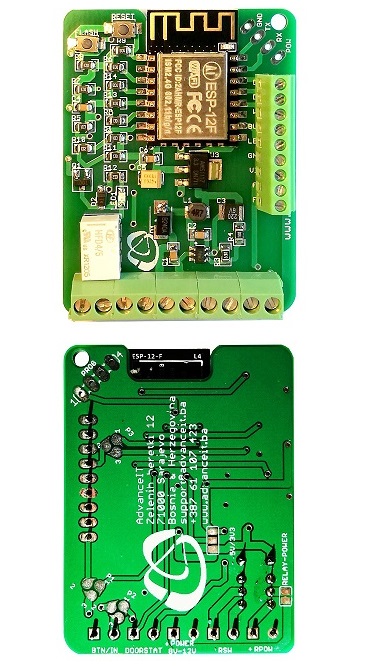
Get more information and see accessory options from Tindie Store

What are others saying about esp-rfid?
“Hi, nice project.”@Rotzbua
“Your app works like a charm”@tueddy
“Just stumbled upon this project while planning to do something similar. Very beautifully done!”@LifeP
“Hello, I've come across your project and first of all… wow - thanks to all contributors for your hard work!”@byt3w4rri0r
“Brilliant work.”@danbicks
“This is an impressive project.”@appi1
“I'd like to thank every single contributor for creating this epic project.”@TheCellMc
“Congratulations for your awesome work! This project is absolutely brilliant.”@quikote

Getting Started

This project still in its development phase. New features (and also bugs) are introduced often and some functions may become deprecated. Please feel free to comment or give feedback.

What You Will Need

Hardware

  • Official ESP-RFID Relay Board or
  • An ESP8266 module or a development board like WeMos D1 mini or NodeMcu 1.0 with at least 32Mbit Flash (equals to 4MBytes) (ESP32 does not supported for now)
  • A MFRC522 RFID PCD Module or PN532 NFC Reader Module or RDM6300 125KHz RFID Module Wiegand based RFID reader
  • A Relay Module (or you can build your own circuit)
  • n quantity of Mifare Classic 1KB (recommended due to available code base) PICCs (RFID Tags) equivalent to User Number

Software

Using Compiled Binaries

Download compiled binaries from GitHub Releases page https://github.com/esprfid/esp-rfid/releases On Windows you can use "flash.bat", it will ask you which COM port that ESP is connected and then flashes it. You can use any flashing tool and do the flashing manually. The flashing process itself has been described at numerous places on Internet.

Building With PlatformIO

Backend

The build environment is based on PlatformIO. Follow the instructions found here: http://platformio.org/#!/get-started for installing it but skip the platform init step as this has already been done, modified and it is included in this repository. In summary:

sudo pip install -U pip setuptools
sudo pip install -U platformio
git clone https://github.com/esprfid/esp-rfid.git
cd esp-rfid
platformio run

When you run platformio run for the first time, it will download the toolchains and all necessary libraries automatically.

Useful commands:
  • platformio run - process/build all targets
  • platformio run -e generic -t upload - process/build and flash just the ESP12e target (the NodeMcu v2)
  • platformio run -t clean - clean project (remove compiled files)

The resulting (built) image(s) can be found in the directory /bin created during the build process.

Frontend

You can not simply edit Web UI files because you will need to convert them to C arrays, which can be done automatically by a gulp script that can be found in tools directory or you can use compiled executables at the same directory as well (for Windows PCs only).

If you want to edit esp-rfid's Web UI you will need (unless using compiled executables):

  • NodeJS
  • npm (comes with NodeJS installer)
  • Gulp (can be installed with npm)

Gulp script also minifies HTML and JS files and compresses (gzip) them.

In order to test your changes without flashing the firmware you can launch websocket emulator which is included in tools directory.

  • You will need to Node JS for websocket emulator.
  • Run npm update to install dependencies
  • Run emulator node wserver.js
  • then you will need to launch your browser with CORS disabled:
  • chrome.exe --args --disable-web-security -–allow-file-access-from-files --user-data-dir="C:\Users\USERNAME"

Get more information here: https://stackoverflow.com/questions/3102819/disable-same-origin-policy-in-chrome

Pin Layout

The following table shows the typical pin layout used for connecting readers hardware to ESP:

ESP8266 NodeMcu/WeMos Wiegand PN532 MFRC522 RDM6300
GPIO-15 D8 SS SDA/SS
GPIO-13 D7 D0 MOSI MOSI
GPIO-12 D6 D1 MISO MISO
GPIO-14 D5 SCK SCK TX
GPIO-04 D2
GPIO-05 D1

For Wiegand based readers, you can configure D0 and D1 pins via settings page. By default, D0 is GPIO-4 and D1 is GPIO-5

Steps

  • First, flash firmware (you can use /bin/flash.bat on Windows) to your ESP either using Arduino IDE or with your favourite flash tool
  • (optional) Fire up your serial monitor to get informed
  • Search for Wireless Network "esp-rfid-xxxxxx" and connect to it (It should be an open network and does not require password)
  • Open your browser and type either "http://192.168.4.1" or "http://esp-rfid.local" (.local needs Bonjour installed on your computer) on address bar.
  • Log on to ESP, default password is "admin"
  • Go to "Settings" page
  • Configure your amazing access control device. Push "Scan" button to join your wireless network, configure RFID hardware, Relay Module.
  • Save settings, when rebooted your ESP will try to join your wireless network.
  • Check your new IP address from serial monitor and connect to your ESP again. (You can also connect to "http://esp-rfid.local")
  • Go to "Users" page
  • Scan a PICC (RFID Tag) then it should glimpse on your Browser's screen.
  • Type "User Name" or "Label" for the PICC you scanned.
  • Choose "Allow Access" if you want to
  • Click "Add"
  • Congratulations, everything went well, if you encounter any issue feel free to ask help on GitHub.

Known Issues

  • You need to connect your MFRC522 reader to your ESP properly or you will end up with a boot loop
  • Please also check GitHub issues.

Time

We are syncing time from a NTP Server (in Client -aka infrastructure- Mode). This will require ESP to have an Internet connection. Additionally your ESP can also work without Internet connection too (Access Point -aka Ad-Hoc- Mode), without giving up functionality. This will require you to do syncing manually. ESP can store and hold time for you approximately 51 days without a major issue, device time can drift from actual time depending on usage, temperature, etc. So you have to login to settings page and sync it in a timely fashion.

Security

We assume ESP-RFID project -as a whole- does not offer strong security. There are PICCs available that their UID (Unique Identification Numbers) can be set manually (Currently esp-rfid relies only UID to identify its users). Also there may be a bug in the code that may result free access to your belongings. And also, like every other network connected device esp-rfid is vulnerable to many attacks including Man-in-the-middle, Brute-force, etc.

This is a simple, hobby grade project, do not use it where strong security is needed.

What can be done to increase security? (by you and by us)

  • We are working on more secure ways to Authenticate RFID Tags.
  • You can disable wireless network to reduce attack surface. (This can be configured in Web UI Settings page)
  • Choose a strong password for the Web UI

Scalability

Since we are limited on both flash and ram size things may get ugly at some point in the future. You can find out some test results below.

Tests

1) How many RFID Tag can be handled?

Restore some randomly generated user data on File System worth:

  • 1000 separate "userfile"
  • random 4 Bytes long UID and
  • random User Names and
  • 4 bytes random Unix Time Stamp
  • each have "access type" 1 byte integer "1" or "0".

Total 122,880 Bytes

At least 1000 unique User (RFID Tag) can be handled, the test were performed on WeMos D1 mini.

Additional testing is needed:

  • Logging needs testing. How long should it need to log access? What if a Boss needs whole year log?
  • Reliability on Flash (these NOR Flash have limited write cycle on their cells). It depends on manufacturer choice of Flash Chip and usage.

Community

  • Chat at https://gitter.im/esp-rfid/Lobby Join community chat on Gitter

Projects that is based on esp-rfid

  • ESP-IO Project to manipulate GPIOs with EventGhost
  • ESP-RCM Room Climate Monitor with ESP8266, HTU21D, Si7021, AM2320

Acknowledgements

  • @rneurink
  • @thunderace
  • @zeraien
  • @nardev
  • @romanzava
  • @arduino12
  • @Pako2

See ChangeLog

Donations

If this project helps you in a way, you can buy us a beer. You can make a donation to the ESP-RFID community with Bountysource

License

The code parts written by ESP-RFID project's authors are licensed under MIT License, 3rd party libraries that are used by this project are licensed under different license schemes, please check them out as well.

MIT License Copyright (c) 2018 esp-rfid Community Copyright (c) 2017 Ömer Şiar Baysal Permission is hereby granted, free of charge, to any person obtaining a copy of this software and associated documentation files (the "Software"), to deal in the Software without restriction, including without limitation the rights to use, copy, modify, merge, publish, distribute, sublicense, and/or sell copies of the Software, and to permit persons to whom the Software is furnished to do so, subject to the following conditions: The above copyright notice and this permission notice shall be included in all copies or substantial portions of the Software. THE SOFTWARE IS PROVIDED "AS IS", WITHOUT WARRANTY OF ANY KIND, EXPRESS OR IMPLIED, INCLUDING BUT NOT LIMITED TO THE WARRANTIES OF MERCHANTABILITY, FITNESS FOR A PARTICULAR PURPOSE AND NONINFRINGEMENT. IN NO EVENT SHALL THE AUTHORS OR COPYRIGHT HOLDERS BE LIABLE FOR ANY CLAIM, DAMAGES OR OTHER LIABILITY, WHETHER IN AN ACTION OF CONTRACT, TORT OR OTHERWISE, ARISING FROM, OUT OF OR IN CONNECTION WITH THE SOFTWARE OR THE USE OR OTHER DEALINGS IN THE SOFTWARE.

简介

ESP8266 RFID (RC522, PN532, Wiegand, RDM6300) Access Control system featuring WebSocket, JSON, NTP Client, Javascript, SPIFFS 展开 收起
MIT
取消

发行版

暂无发行版

贡献者

全部

近期动态

加载更多
不能加载更多了
C++
1
https://gitee.com/huaxiuyiwei/esp-rfid.git
git@gitee.com:huaxiuyiwei/esp-rfid.git
huaxiuyiwei
esp-rfid
esp-rfid
stable

搜索帮助