

代码拉取完成,页面将自动刷新
目录

tips:
可以通过设置去除debug的标志
debugShowCheckedModeBanner: false,
Inkwell组件的使用可以增加点击事件
url_launcher组件的使用
打电话,打开网页,发邮件等等功能
decoration:BoxDecoration中的border可以设置边界with AutomaticKeepAliveClientMixin重写@override
// TODO: implement wantKeepAlive
bool get wantKeepAlive => true;
StatefulWidget
IndexedStack()
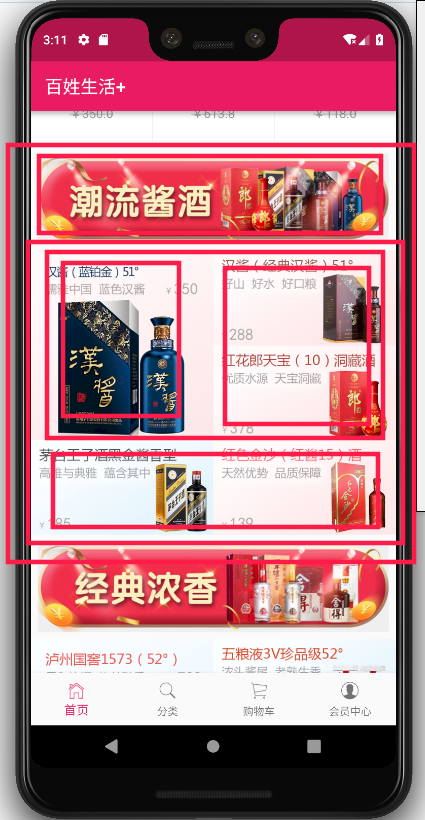
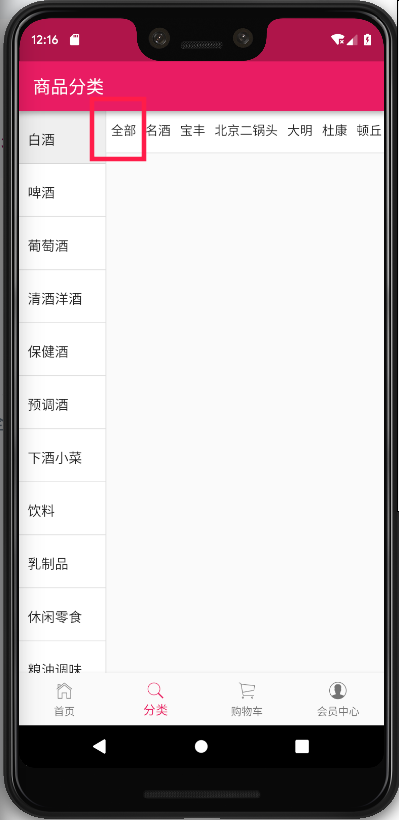
逐步的拆分一个复杂的界面
效果
//楼层标题
class FloorTitle extends StatelessWidget {
  // ignore: non_constant_identifier_names
  final String picture_address;
  const FloorTitle({Key key, this.picture_address}) : super(key: key);

  @override
  Widget build(BuildContext context) {
    return Container(
      padding: const EdgeInsets.all(8.0),
      child: Image.network(picture_address),
    );
  }
}

//楼层商品列表
class FloorContent extends StatelessWidget {
  final List floorGoodsList;
  const FloorContent({Key key, this.floorGoodsList}) : super(key: key);

  @override
  Widget build(BuildContext context) {
    return Container(
      child: Column(
        children: <Widget>[
          _firstRowGoods(),
          _otherGoods(),
        ],
      ),
    );
  }

  Widget _firstRowGoods() {
    return Row(
      children: <Widget>[
        _goodsItem(floorGoodsList[0]),
        Column(
          children: <Widget>[
            _goodsItem(floorGoodsList[1]),
            _goodsItem(floorGoodsList[2]),
          ],
        ),
      ],
    );
  }

  Widget _otherGoods() {
    return Row(
      children: <Widget>[
        _goodsItem(floorGoodsList[3]),
        _goodsItem(floorGoodsList[4]),
      ],
    );
  }

  Widget _goodsItem(Map goods) {
    return Container(
      width: ScreenUtil().setWidth(375),
      child: InkWell(
        onTap: () {
          print('点击了楼层商品');
        },
        child: Image.network(
          goods['image'],
        ),
      ),
    );
  }
}
接口请求方法类似
将相同部分抽取出来
不同的部分通过参数传递进去
//抽出一个通用的方法
Future request(url,{fromData})async{
  print('开始获取数据....');
  try {
    Response response;
    Dio dio = Dio();
    dio.options.contentType =
        ContentType.parse('application/x-www-form-urlencoded');
    if(fromData!=null){
      response = await dio.post(servicePath[url], data: fromData);
    }else{
      response = await dio.post(servicePath[url]);
    }
    if (response.statusCode == 200) {
      return response.data;
    } else {
      throw Exception('后端接口出现异常');
    }
  }catch(e){
    return print('ERROR:======>$e');
  }
}
Text下划线可以通过decoration:属性实现
Text(
      '¥${val['price']}',
      style: TextStyle(
            color: Colors.black26,
            decoration: TextDecoration.lineThrough),
),
wrap中的spacing可以设置列数
使用wrap前将list 转换成list
加载插件很多,目前项目使用flutter_easyrefresh
该插件要求布局是ListView/ScrollView
refreshFooter: ClassicsFooter()可以自定义加载的一些内容
更多的自定义内容查看文档可知
import 'package:flutter_easyrefresh/easy_refresh.dart';
....
  GlobalKey<RefreshFooterState> _footerKey = new GlobalKey<RefreshFooterState>();
....
EasyRefresh(
    refreshFooter: ClassicsFooter(
                  key: _footerKey,
                  bgColor: Colors.white,
                  textColor: Colors.pink,
                  moreInfoColor: Colors.pink,
                  showMore: true,
                  noMoreText: '',
                  //由于目前不知道到底有多少数据因此不设置noMoreText
                  moreInfo: '加载中...',
                  loadReadyText: '上拉加载',
      ),
      child: ListView(
                children: <Widget>[

                ],
     ),
     onRefresh: () async{
        ....
     },
     loadMore: () async {
         ....
     },
);
使用插件注意一个问题
该插件的上拉加载效果会与系统中其它有上拉加载的控件((如GridView)的系统默认上拉加载效果冲突(错误的触发上拉加载效果)
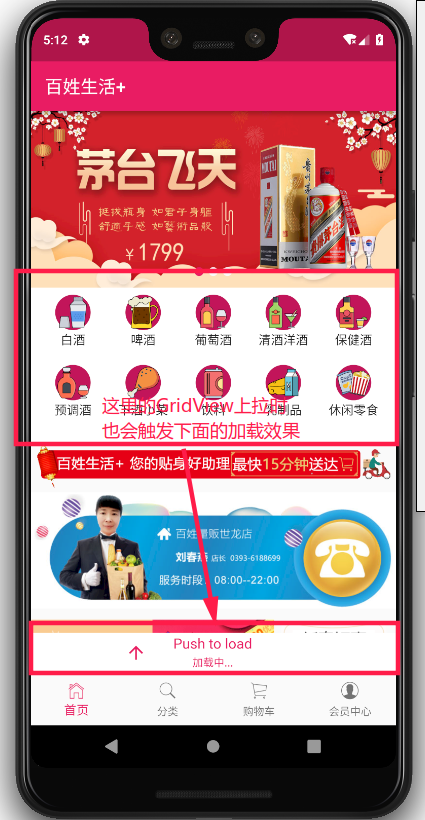
**解决方法:**取消系统自带的上拉加载效果
//找到对应控件加上即可禁止系统回弹
physics: NeverScrollableScrollPhysics(),
**知识点:**滑动控件禁止回弹效果physics: NeverScrollableScrollPhysics(),
JSON的原数据(部分展示一个结构)如下Json格式化工具
{
    "code": "0",
    "message": "success",
    "data": [{
        "mallCategoryId": "4",
        "mallCategoryName": "白酒",
        "bxMallSubDto": [{
            "mallSubId": "2c9f6c94621970a801626a35cb4d0175",
            "mallCategoryId": "4",
            "mallSubName": "名酒",
            "comments": ""
        }, {
            "mallSubId": "2c9f6c94621970a801626a363e5a0176",
            "mallCategoryId": "4",
            "mallSubName": "宝丰",
            "comments": ""
        }],
        "comments": null,
        "image": "http://images.baixingliangfan.cn/firstCategoryPicture/20190131/20190131170036_4477.png"
    },{
        "mallCategoryId": "1",
        "mallCategoryName": "啤酒",
        "bxMallSubDto": [{
            "mallSubId": "2c9f6c946016ea9b016016f79c8e0000",
            "mallCategoryId": "1",
            "mallSubName": "百威",
            "comments": ""
        }, {
            "mallSubId": "2c9f6c94608ff843016095163b8c0177",
            "mallCategoryId": "1",
            "mallSubName": "福佳",
            "comments": ""
        }],
        "comments": null,
        "image": "http://images.baixingliangfan.cn/firstCategoryPicture/20190131/20190131170044_9165.png"
    }]
}
对应的Model如下
class CategoryBigModel {
  String mallCategoryId;
  String mallCategoryName;
  List<dynamic> bxMallSubDto;
  Null comments;
  String image;

  CategoryBigModel(
      {this.mallCategoryId,
      this.mallCategoryName,
      this.bxMallSubDto,
      this.comments,
      this.image});

  //工厂构造方法,可以不new直接使用
  factory CategoryBigModel.fromJson(dynamic json) {
    return CategoryBigModel(
        mallCategoryId: json['mallCategoryId'],
        mallCategoryName: json['mallCategoryName'],
        bxMallSubDto: json['bxMallSubDto'],
        comments: json['comments'],
        image: json['image']);
  }
}

//列表的Model
class CategoryBigListModel{
  List<CategoryBigModel> data;

  CategoryBigListModel(this.data);

  factory CategoryBigListModel.fromJson(List json){
    return CategoryBigListModel(
      json.map((val)=>CategoryBigModel.fromJson(val)).toList()
    );
  }

}
Model的使用
引入
import '../model/category.dart';
然后传入数据使用
void _getCategory() async {
    await request('getCategory').then((val) {
      var data = json.decode(val.toString());
      CategoryBigListModel  list=
             CategoryBigListModel.fromJson(data['data']);
      list.data.forEach((item)=>print(item.mallCategoryName));
    });
  }
通过json直接生成Model的工具json_to_dart
使用Container可以完成很多东西,比如边框
 Widget _leftInkWell(int index) {
    return InkWell(
      onTap: () {},
      child: Container(
        height: ScreenUtil().setHeight(100),
        padding: const EdgeInsets.only(left: 10, top: 20),
        decoration: BoxDecoration(
          color: Colors.white,
          border: Border(
            bottom: BorderSide(
              color: Colors.black12,
              width: 1.0,
            ),
          ),
        ),
        child: Text(list[index].mallCategoryName),
      ),
    );
  }
状态管理方案
Scoped Model(早期)
Redux(Fish Redux)
Bloc(非官方)
Provide(目前Google新出的)
StatefulWidget(耦合度太高,后期维护成本过高)
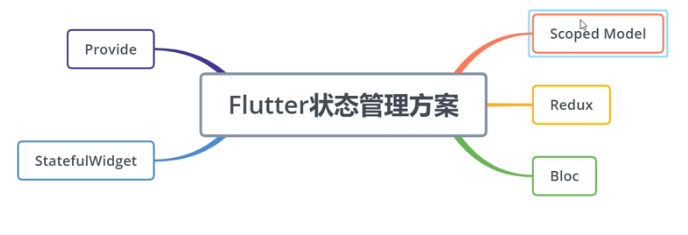
当前学习Provide
使用步骤
引入包
provide: ^1.0.2
tips:如果发现Packages get时flutter锁了无法可以删除锁
rm ./flutter/bin/cache/lockfile
创建状态控制的类
import 'package:flutter/material.dart';

///提供小部件可以重建对实现可监听接口的任何类的更改。
///在这里,我们混合使用ChangeNotifier,这样我们就不需要自己管理监听器了。
///扩展ValueNotifier <int>将是另一种简单的方法。
class Counter with ChangeNotifier {
  int _value;

  int get value => _value;//get函数

  Counter(this._value);//构造函数

  void increment() {//方法
    _value++;
    notifyListeners();
  }
}
在入口加入provide
void main() {
  final providers = Providers()
    ..provide(Provider.function((context) => Counter(0)));
  runApp(
    ProviderNode(child: MyApp(), providers: providers),
  );
}
使用
获取值
//使用Provide状态管理用于显示数字
class Number extends StatelessWidget {
  @override
  Widget build(BuildContext context) {
    return Container(
      child: Provide<Counter>(
          builder: (context, child, counter) {
            return Text(
              '${counter.value}',
              style: TextStyle(fontSize: 36),
            );
          }
      ),
    );
  }
}
调用方法
//Provide状态管理点击增加数字
class MyButton extends StatelessWidget {
  @override
  Widget build(BuildContext context) {
    //从包含Counter的最近的ProviderNode获取Counter。
    //这不会导致此小部件在计数器更改时重建
    final currentCounter = Provide.value<Counter>(context);
    return RaisedButton(
      child: Text('点击数字增加'),
      onPressed: () {
        //调用方法
        currentCounter.increment();
      },
    );
  }
}
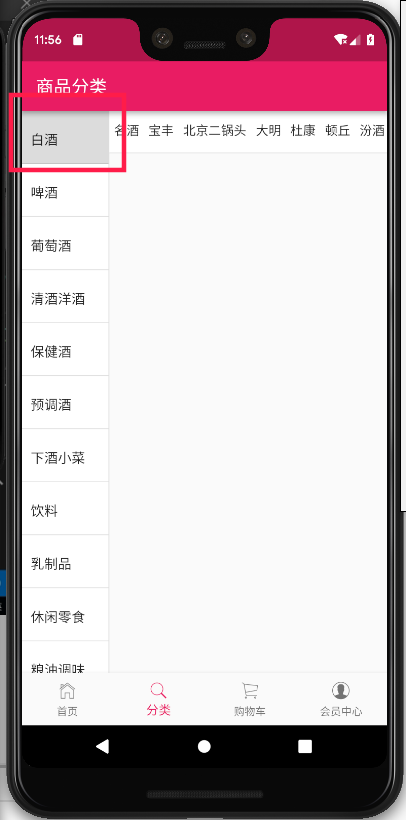
完成一个布局,可以先从小的部件再组合成大的部分
完成列表栏的状态管理
引入Provide管理数据(步骤参考24)
import 'package:flutter/material.dart';
import '../model/category.dart';
class ChildCategory with ChangeNotifier {
 List<BxMallSubDto> childCategoryList = [];
  setChildCategory(List list) {
 childCategoryList = list;
 notifyListeners();
 }
}
在点击左侧的子项时讲数据通过Provide传给childCategoryList
onTap: () {
 var childList = list[index].bxMallSubDto; //大类的子类所有赋值
 Provide.value<ChildCategory>(context).setChildCategory(childList);
},
左侧列表通过Provide获取数据并显示
Provide<ChildCategory>(builder: (context, child, childCategory) {
   return ...
});
Widget build(BuildContext context) {
    return Provide<ChildCategory>(
      builder: (context, child, childCategory) {
        return Container(
          height: ScreenUtil().setHeight(80),
          width: ScreenUtil().setWidth(570),
          decoration: BoxDecoration(
              color: Colors.white,
              border:
                 Border(bottom:
                 BorderSide(color: Colors.black12, width: 1))),
          child: ListView.builder(
            itemCount: childCategory.childCategoryList.length,
            scrollDirection: Axis.horizontal,
            itemBuilder: (context, index) {
              return _rightInkWell(
              childCategory.childCategoryList[index]
              );
            },
          ),
        );
      },
    );
  }

左侧栏点击效果实现(一种方法)
设置一个clickIndex记录当前的点击下标
int clickIndex = 0;
//记录左侧点击的index
在点击中设置点击标志
bool isClick = false;
isClick = (clickIndex == index);
return InkWell(
    onTap: () {
      setState(() {
          clickIndex = index;
      });
       var childList = list[index].bxMallSubDto; //大类的子类所有赋值
        Provide.value<ChildCategory>(context).setChildCategory(childList);
      },
在背景颜色处根据标志设置背景色
color: isClick ? Colors.black12 : Colors.white,
解决刚进入时左侧点击效果右侧空白的bug
在获取数据时将list[0].bxMallSubDto的右侧栏的值传过去,解决刚进入时左侧0点击状态右侧为空的bug
void _getCategory() async {
    await request('getCategory').then((val) {
      var data = json.decode(val.toString());
      CategoryModel category = CategoryModel.fromJson(data);
      setState(() {
        list = category.data;
      });

      //将list[0].bxMallSubDto的右侧栏的值传过去,解决刚进入时左侧0点击状态右侧为空的bug
      Provide.value<ChildCategory>(context).setChildCategory(list[0].bxMallSubDto);
    });
  }
颜色修改美化
color: isClick ? Color.fromRGBO(236, 236, 236, 0.8) : Colors.white,
后台数据未给出全部的标签数据
class ChildCategory with ChangeNotifier {
  List<BxMallSubDto> childCategoryList = [];

  setChildCategory(List<BxMallSubDto> list) {
    //由于全部标签数据未给出,因此自己提前制作一个全部的标签
    BxMallSubDto all = BxMallSubDto();
    all.mallSubId = "00";
    all.mallCategoryId = "00";
    all.comments = null;
    all.mallSubName = "全部";
    //前面加上all,再加入list
    childCategoryList=[all];
    childCategoryList.addAll(list);
    notifyListeners();
  }
}
添加新的接口链接
//用于维护服务器接口和URL的文件
const serviceUrl = 'http://test.baixingliangfan.cn/baixing/';
const servicePath = {
  'homePageContent': serviceUrl + 'wxmini/homePageContent', //商店首页信息
  'homePageBelowConten': serviceUrl+'wxmini/homePageBelowConten', //商城首页热卖商品拉取
  'getCategory': serviceUrl+'wxmini/getCategory', //商品类别信息
  'getMallGoods': serviceUrl+'wxmini/getMallGoods', //商品分类商品列表信息
};
通过接口访问接口获取数据
void _getGoodsList() async{
    var data={
      'categoryId':'4',
      'categorySubId':'',
      'page':1
    };
    await request('getMallGoods',fromData: data).then((val){
      var data=json.decode(val.toString());
      print('分类商品列表>>>>>>>${val}');
    });
  }
json_to_dart网站将json数据装换为dart模型数据
由于部分的数据与上次的category模型同名,因此需要做相应的修改
class CategoryGoodsListModel {
  String code;
  String message;
  List<CategoryListData> data;

  CategoryGoodsListModel({this.code, this.message, this.data});

  CategoryGoodsListModel.fromJson(Map<String, dynamic> json) {
    code = json['code'];
    message = json['message'];
    if (json['data'] != null) {
      data = new List<CategoryListData>();
      json['data'].forEach((v) {
        data.add(new CategoryListData.fromJson(v));
      });
    }
  }

  Map<String, dynamic> toJson() {
    final Map<String, dynamic> data = new Map<String, dynamic>();
    data['code'] = this.code;
    data['message'] = this.message;
    if (this.data != null) {
      data['data'] = this.data.map((v) => v.toJson()).toList();
    }
    return data;
  }
}

class CategoryListData {
  String image;
  double oriPrice;
  double presentPrice;
  String goodsName;
  String goodsId;

  CategoryListData(
      {this.image,
        this.oriPrice,
        this.presentPrice,
        this.goodsName,
        this.goodsId});

  CategoryListData.fromJson(Map<String, dynamic> json) {
    image = json['image'];
    oriPrice = json['oriPrice'];
    presentPrice = json['presentPrice'];
    goodsName = json['goodsName'];
    goodsId = json['goodsId'];
  }

  Map<String, dynamic> toJson() {
    final Map<String, dynamic> data = new Map<String, dynamic>();
    data['image'] = this.image;
    data['oriPrice'] = this.oriPrice;
    data['presentPrice'] = this.presentPrice;
    data['goodsName'] = this.goodsName;
    data['goodsId'] = this.goodsId;
    return data;
  }
}
使用model类替换之前的map方法获取数据
引入model类
import 'package:flutter_shop/model/categoryGoodsList.dart';
之后将json数据转换成model数据
修改前:
void _getGoodsList() async{
    var data={
      'categoryId':'4',
      'categorySubId':'',
      'page':1
    };
    await request('getMallGoods',fromData: data).then((val){
      var data=json.decode(val.toString());
      print('分类商品列表>>>>>>>${val}');
    });
  }
修改后:
void _getGoodsList() async {
    var data = {'categoryId': '4', 'categorySubId': '', 'page': 1};
    await request('getMallGoods', fromData: data).then((val) {
      var data = json.decode(val.toString());
      CategoryGoodsListModel goodsListModel =
          CategoryGoodsListModel.fromJson(data);
           print('goodsList>>>>>>>${goodsListModel.data[0].goodsName}');
    });
  }
将一个UI布局拆分成小部分制作后拼接起来
Widget _goodsImage(index) {
    return Container(
      width: ScreenUtil().setWidth(200),
      child: Image.network(categoryGoodsList[index].image),
    );
  }

  Widget _goodsName(index) {
    return Container(
      padding: EdgeInsets.all(5.0),
      width: ScreenUtil().setWidth(370),
      alignment: Alignment.centerLeft,
      child: Text(
        categoryGoodsList[index].goodsName,
        maxLines: 2,
        overflow: TextOverflow.ellipsis,
        style: TextStyle(
          fontSize: ScreenUtil().setSp(26),
          color: Colors.black,
        ),
      ),
    );
  }

 Widget _goodsPrice(index) {
    return Container(
      margin: EdgeInsets.only(top: 20.0),
      padding: EdgeInsets.only(right: 30.0),
      width: ScreenUtil().setWidth(370),
      child: Row(
        mainAxisAlignment: MainAxisAlignment.spaceBetween,
        children: <Widget>[
          Text(
            '价格¥${categoryGoodsList[index].presentPrice}',
            style: TextStyle(color: Colors.pink),
          ),
          Text(
            '¥${categoryGoodsList[index].oriPrice}',
            style: TextStyle(
              decoration: TextDecoration.lineThrough,
              color: Colors.black12,
            ),
          ),
        ],
      ),
    );
  }

  Widget _goodsItem(index) {
    return InkWell(
      onTap: () {},
      child: Container(
        padding: EdgeInsets.only(top: 5.0, bottom: 5.0),
        decoration: BoxDecoration(
          color: Colors.white,
          border: Border(
            bottom: BorderSide(
              color: Colors.black12,
              width: 1.0,
            ),
          ),
        ),
        child: Row(
          children: <Widget>[
            _goodsImage(index),
            Column(
              children: <Widget>[
                _goodsName(index),
                _goodsPrice(index),
              ],
            ),
          ],
        ),
      ),
    );
  }
效果
新建provide,原则改变哪个部分就针对哪个部分的
//provide类
import 'package:flutter/material.dart';
import 'package:flutter_shop/model/categoryGoodsList.dart';

class CategoryGoodsListProvide extends ChangeNotifier {
  List<CategoryListData> goodsList = [];

  //点击大类更换商品列表
  setGoodsList(List<CategoryListData> list) {
    goodsList = list;
    notifyListeners();
  }
}

//主入口处添加
void main() {
  final providers = Providers()
    ..provide(Provider<Counter>.value(Counter(0)))
    ..provide(Provider<ChildCategory>.value(ChildCategory()))
    ..provide(
        Provider<CategoryGoodsListProvide>.value(CategoryGoodsListProvide()));
  runApp(
    ProviderNode(child: MyApp(), providers: providers),
  );
}
在左侧列表中创建获取商品列表的方法
   void _getGoodsList({String categoryId}) async {
      var data = {
        'categoryId': categoryId == null ? '4' : categoryId,
        'categorySubId': '',
        'page': 1,
      };
      await request('getMallGoods', fromData: data).then((val) {
        var data = json.decode(val.toString());
        CategoryGoodsListModel goodsList = CategoryGoodsListModel.fromJson(data);
        Provide.value<CategoryGoodsListProvide>(context)
            .setGoodsList(goodsList.data);
      });
    }


  //在onTap()中调用

   onTap: () {
          setState(() {
            clickIndex = index;
          });
          var childList = list[index].bxMallSubDto; //大类的子类所有赋值
          Provide.value<ChildCategory>(context).setChildCategory(childList);
          var categoryId= list[index].mallCategoryId;//获取点击项的categoryId
          _getGoodsList(categoryId: categoryId);
        },


  //左侧导航栏initState()调用一下初始化
  @override
    void initState() {
      _getCategory();
      _getGoodsList();
      super.initState();
    }
修改商品列表的build方法使用provide传值
注意修改传值的参数增加一个goodsList由provide提供(之前是通过内部的list传值)
_goodsItem(data.goodsList,index);
_goodsImage(List goodsList,index)
_goodsName(List goodsList,index)
_goodsPrice(List goodsList,index)
Widget build(BuildContext context) {
    return Provide<CategoryGoodsListProvide>(
      builder: (context, child, data) {
        return Container(
          width: ScreenUtil().setWidth(570),
          height: ScreenUtil().setHeight(979),
          child: ListView.builder(
            itemCount: data.goodsList.length,
            itemBuilder: (context, index) {
              return _goodsItem(data.goodsList,index);
            },
          ),
        );
      },
    );
  }
效果
前一节课中右不商品列表通过container设置高的方式可能在某些机型上会出现溢出bug
改良方法是外部嵌套一个Expanded()可伸缩的组件这样就不会溢出了
@override
  Widget build(BuildContext context) {
    return Provide(
      builder: (context, child, data) {
        return Container(
          width: ScreenUtil().setWidth(570),
          height: ScreenUtil().setHeight(979),
          child: ListView.builder(
            itemCount: data.goodsList.length,
            itemBuilder: (context, index) {
              return _goodsItem(data.goodsList, index);
            },
          ),
        );
      },
    );
  }

>>>>>>>>>>>>>>>>>>>>>>修改后>>>>>>>>>>>>>>>>>>>>>>
@override
  Widget build(BuildContext context) {
    return Provide(
      builder: (context, child, data) {
        return Expanded(
          child: Container(
            width: ScreenUtil().setWidth(570),
            child: ListView.builder(
              itemCount: data.goodsList.length,
              itemBuilder: (context, index) {
                return _goodsItem(data.goodsList, index);
              },
            ),
          ),
        );
      },
    );
  }
修改侧边子类的Provide增加对于子类的下标控制childIndex
import 'package:flutter/material.dart';
import '../model/category.dart';

class ChildCategory with ChangeNotifier {
  List childCategoryList = [];
  int childIndex = 0; //子类索引(增加)

  //大类切换逻辑
  setChildCategory(List list) {
    childIndex = 0; //点击大类子类的索引置为0(增加)

    //由于全部标签数据未给出,因此自己提前制作一个全部的标签
    BxMallSubDto all = BxMallSubDto();
    all.mallSubId = "00";
    all.mallCategoryId = "00";
    all.comments = null;
    all.mallSubName = "全部";

    childCategoryList = [all];
    childCategoryList.addAll(list);
    notifyListeners();
  }

  //改变子类索引(增加)
  changChildIndex(int index) {
    childIndex = index;
    notifyListeners();
  }
}
修改右侧小类导航点击时的点击效果
参数增加index
增加点击效果
Widget _rightInkWell(BxMallSubDto item, int index) {
    bool isClick = false;//判断是否点击的标志(增加)
    isClick = (index == Provide.value(context).childIndex)
        ? true
        : false;
    return Container(
      padding: EdgeInsets.fromLTRB(5.0, 10.0, 5.0, 10.0),
      child: InkWell(
        child: Text(
          item.mallSubName,
          style: TextStyle(
            fontSize: ScreenUtil().setSp(26),
            color: isClick ? Colors.pink : Colors.black, //动态显示高亮(增加)
          ),
        ),
        onTap: () {
            //动态修改(增加)
            Provide.value(context).changChildIndex(index);
        },
      ),
    );
  }
由于子类列表切换时需要使用到父类的ID,因此先将大类的ID需要先放入Provide
class ChildCategory with ChangeNotifier {
  List childCategoryList = [];
  String categoryId = '4'; //大类ID用于切换小类列表(增加)
  int childIndex = 0; //子类索引

  //大类切换逻辑
  setChildCategory(List list, String id) {
    childIndex = 0; //点击大类子类的索引置为0
    categoryId = id;//传递大类ID(增加)

    //由于全部标签数据未给出,因此自己提前制作一个全部的标签
    BxMallSubDto all = BxMallSubDto();
    all.mallSubId = "00";
    all.mallCategoryId = "00";
    all.comments = null;
    all.mallSubName = "全部";

    childCategoryList = [all];
    childCategoryList.addAll(list);
    notifyListeners();
  }

  //改变子类索引
  changChildIndex(int index) {
    childIndex = index;
    notifyListeners();
  }
}
在右侧子类点击处增加获取列表的方法
Widget _rightInkWell(BxMallSubDto item, int index) {
    bool isClick = false;
    isClick = (index == Provide.value(context).childIndex)
        ? true
        : false;
    return Container(
      padding: EdgeInsets.fromLTRB(5.0, 10.0, 5.0, 10.0),
      child: InkWell(
        child: Text(
          item.mallSubName,
          style: TextStyle(
            fontSize: ScreenUtil().setSp(26),
            color: isClick ? Colors.pink : Colors.black, //动态显示高亮
          ),
        ),
        onTap: () {
          Provide.value(context).changChildIndex(index);
          _getGoodsList(item.mallSubId);
        },
      ),
    );
  }

//点击获取商品列表的方法(增加)
  void _getGoodsList(String categorySubId) async {
    var data = {
      'categoryId': Provide.value(context).categoryId,
      'categorySubId': categorySubId,
      'page': 1,
    };
    await request('getMallGoods', fromData: data).then((val) {
      var data = json.decode(val.toString());
      CategoryGoodsListModel goodsList = CategoryGoodsListModel.fromJson(data);
      Provide.value(context)
          .setGoodsList(goodsList.data);
    });
  }
}
此事如果获取的商品列表为空会出现bug
修复方法:在渲染商品列表前先判断获取列表是否为空即可
@override
  Widget build(BuildContext context) {
    return Provide(
      builder: (context, child, data) {
        return Expanded(
          child: Container(
            width: ScreenUtil().setWidth(570),
            child: data.goodsList == null
                ? Center(child: Text('商品暂时无货'),)
                : ListView.builder(
                    itemCount: data.goodsList.length,
                    itemBuilder: (context, index) {
                      return _goodsItem(data.goodsList, index);
                    },
                  ),
          ),
        );
      },
    );
  }
效果
class ChildCategory with ChangeNotifier {
  List<BxMallSubDto> childCategoryList = [];
  String categoryId = '4'; //大类ID用于切换小类列表
  int childIndex = 0; //子类索引
  String subId = ''; //子类ID

  int page=1;//列表的页数(增加)
  String noMoreText='';//加载中无数据显示的text(增加)

  //大类切换逻辑
  setChildCategory(List<BxMallSubDto> list, String id) {
    childIndex = 0; //点击大类子类的索引置为0
    categoryId = id;
    //切换大类时初始化(增加)
    page=1;
    noMoreText='';

    //由于全部标签数据未给出,因此自己提前制作一个全部的标签
    BxMallSubDto all = BxMallSubDto();
    all.mallSubId = "00";
    all.mallCategoryId = "00";
    all.comments = null;
    all.mallSubName = "全部";

    childCategoryList = [all];
    childCategoryList.addAll(list);
    notifyListeners();
  }

  //改变子类索引
  changChildIndex(int index, String id) {
    childIndex = index;
    subId = id;
    notifyListeners();
  }

  //增加Page的方法(增加)
  addPage(){
    page++;
  }
    //增加Page的方法
  addPage() {
    page++;
  }

  //改变noMoreText的方法(增加)
  changeNoMoreText(String newNoMoreText) {
    noMoreText=newNoMoreText;
    notifyListeners();
  }
}
引入easy_refresh组件开始布局
增加getMoreGoodsList方法
void _getMoreGoodsList() async {
    Provide.value<ChildCategory>(context).addPage();
    var data = {
      'categoryId': Provide.value<ChildCategory>(context).categoryId,
      'categorySubId': Provide.value<ChildCategory>(context).subId,
      'page': Provide.value<ChildCategory>(context).page,
    };
    await request('getMallGoods', fromData: data).then((val) {
      var data = json.decode(val.toString());
      CategoryGoodsListModel goodsList = CategoryGoodsListModel.fromJson(data);
      if (goodsList.data == null) {
        Provide.value<ChildCategory>(context).changeNoMoreText('没有更多');
      } else {
        Provide.value<CategoryGoodsListProvide>(context)
            .setMoreGoodsList(goodsList.data);
      }
    });
  }
tip:需要将ctaegory_goods_list中的方法修改一下,因为需要添加list在里面
class CategoryGoodsListProvide extends ChangeNotifier {
  List<CategoryListData> goodsList = [];

  //点击大类更换商品列表
  setGoodsList(List<CategoryListData> list) {
    goodsList = list;
    notifyListeners();
  }
  //上拉加载更多商品列表(增加)
  setMoreGoodsList(List<CategoryListData> list) {
    goodsList.addAll(list);
    notifyListeners();
  }
}
切换大类列表位置要切换到最前面
首先实例化一个ScrollController控制列表滑动(这个是ListView自带的)
通过ScrollerController在进入前判断如果Page==1则jumpTo(0.0)回到最开始
try {
   if (Provide.value<ChildCategory>(context).page == 1) {
       _scrollController.jumpTo(0.0);
   }
} catch (e) {
     print('第一次进入');
}

ListView.builder(
        controller: _scrollController,
        itemCount: data.goodsList.length,
        itemBuilder: (context, index) {
           return _goodsItem(data.goodsList, index);
        },
),
完整展示:
@override
  Widget build(BuildContext context) {
    return Provide<CategoryGoodsListProvide>(
      builder: (context, child, data) {
        if (data.goodsList == null) {
          return Expanded(
            child: Center(
              child: Text('商品暂时无货'),
            ),
          );
        } else {
          try {
            if (Provide.value<ChildCategory>(context).page == 1) {
              _scrollController.jumpTo(0.0);
            }
          } catch (e) {
            print('第一次进入');
          }
          return Expanded(
            child: Container(
              width: ScreenUtil().setWidth(570),
              child: EasyRefresh(
                refreshFooter: ClassicsFooter(
                  key: _footerKey,
                  bgColor: Colors.white,
                  textColor: Colors.pink,
                  moreInfoColor: Colors.pink,
                  showMore: true,
                  noMoreText: Provide.value<ChildCategory>(context).noMoreText,
                  moreInfo: '加载中...',
                  loadReadyText: '上拉加载',
                ),
                child: ListView.builder(
                  controller: _scrollController,
                  itemCount: data.goodsList.length,
                  itemBuilder: (context, index) {
                    return _goodsItem(data.goodsList, index);
                  },
                ),
                loadMore: () async {
                  _getMoreGoodsList();
                },
              ),
            ),
          );
        }
      },
    );
  }
Toast插件https://github.com/PonnamKarthik/FlutterToast
使用步骤:
#提示插件
  fluttertoast: ^3.0.1

import 'package:fluttertoast/fluttertoast.dart';
Fluttertoast.showToast(
        msg: "This is Center Short Toast",
        toastLength: Toast.LENGTH_SHORT,
        gravity: ToastGravity.CENTER,
        timeInSecForIos: 1,
        backgroundColor: Colors.red,
        textColor: Colors.white,
        fontSize: 16.0
    );
bug修复,点击全部显示暂时无商品
修复:修改全部标签的mallSubId使其请求有数据即可
//大类切换逻辑
  setChildCategory(List<BxMallSubDto> list, String id) {
    childIndex = 0; //点击大类子类的索引置为0
    categoryId = id;
    //切换大类时初始化
    page = 1;
    noMoreText = '';

    //由于全部标签数据未给出,因此自己提前制作一个全部的标签
    BxMallSubDto all = BxMallSubDto();
    all.mallSubId = '';//('00'-->'')这样就不会请求为空了(修改处)
    all.mallCategoryId = '00';
    all.comments = null;
    all.mallSubName = '全部';

    childCategoryList = [all];
    childCategoryList.addAll(list);
    notifyListeners();
  }
GitHub:https://github.com/theyakka/fluro
 #企业级路由管理
  fluro: ^1.4.0
 #也可以通过gitHub引入
   fluro:
   git: git://github.com/theyakka/fluro.git

 //在main中引入
  import 'package:fluro/fluro.dart';
在主入口初始化
final router = Router();
新建一个文件用于管理路由

单个路由配置(detail页为例):
import 'package:flutter/material.dart';
import 'package:fluro/fluro.dart';
import '../pages/details_page.dart'; //引入页面

//编写路由页面的Handler
Handler detailsHandler = new Handler(
  handlerFunc: (BuildContext context, Map<String, dynamic> params) {
    String goodsId = params['id'].first;
    print('index>detail goodsId is ${goodsId}');
    return DetailsPage(goodsId);
  },
);
总体路由配置:

import 'package:flutter/material.dart';
import 'package:fluro/fluro.dart';
import 'package:flutter_shop/routers/route_handler.dart';

class Routes {
  static String root = '/'; //根目录
  static String detailsPage = '/detail';//页面目录

  static void configureRouters(Router router) {
      //处理无路由情况
    router.notFoundHandler = new Handler(
      handlerFunc: (BuildContext context, Map<String, List<String>> params) {
        print('ERROR');
      },
    );
      //定义路由
    router.define(detailsPage, handler: detailsHandler);
  }
}
为了方便使用可以将路由静态化:
新建一个文件:

import 'package:fluro/fluro.dart';

//路由静态化,之后调用直接Application.router
class Application {
  static Router router;
}
//路由注入引入以下文件(增加)
import 'package:fluro/fluro.dart';
import 'package:flutter_shop/routers/routers.dart';
import 'package:flutter_shop/routers/application.dart';
void main() {
  final providers = Providers()
    ..provide(Provider<Counter>.value(Counter(0)))
    ..provide(Provider<ChildCategory>.value(ChildCategory()))
    ..provide(
        Provider<CategoryGoodsListProvide>.value(CategoryGoodsListProvide()));
  runApp(
    ProviderNode(child: MyApp(), providers: providers),
  );
}

class MyApp extends StatelessWidget {
  @override
  Widget build(BuildContext context) {

    //路由的注入(增加)
    final router=Router();
    Routes.configureRouters(router);
    Application.router=router;//静态化

    return Container(
      child: MaterialApp(
        title: '百姓生活+',
        onGenerateRoute: Application.router.generator,//引入路由管理(增加)

        debugShowCheckedModeBanner: false,
        theme: ThemeData(
          primarySwatch: Colors.pink,
        ),
        home: IndexPage(),
      ),
    );
  }
}
使用:
import 'package:flutter_shop/routers/application.dart';
onTap: () {
            Application.router.navigateTo(
              context,
              '/detail?id=${val['goodsId']}',
                //这里的/detail是和之前全局配置文件中页面路由路径一致
                //?传入参数id是在之前Handler中配置的id
            );
          },
总结一下:
Fluro路由的使用步骤
通过https://javiercbk.github.io/json_to_dart/
将Json数据装换为Model
然后添加接口、Provide
(此次将网络请求放在Provide将UI和逻辑分离)
mport 'package:flutter/material.dart';
import 'package:flutter_shop/model/details.dart';
import 'package:flutter_shop/service/service_method.dart';
import 'dart:convert';

class DatailsInfoProvide with ChangeNotifier {
  DetailsModel goodsInfo = null;

  //从后台获取商品数据
  getGoodsInfo(String id) async{
    var fromData = {'goodId': id};
    await request('getGoodDetailById', fromData: fromData).then((val) {
      //从后台得到数据
      var responseData = json.decode(val.toString());
      print(responseData);
      goodsInfo = DetailsModel.fromJson(responseData);
      notifyListeners();
    });
  }
}
然后在Main中进行全局的注入即可使用
在详细页测试是否调通
tips:
测试过程中如果返回的数据显示类型出错可能是Model建立的问题
import 'package:flutter/material.dart';
import 'package:provide/provide.dart';
import 'package:flutter_shop/provide/details_info.dart';

//商品详情页
class DetailsPage extends StatelessWidget {
  final String goodsId;

  DetailsPage(this.goodsId);

  @override
  Widget build(BuildContext context) {
    _getBackInfo(context);
    return Container(
      child: Center(
        child: Text('商品id${goodsId}'),
      ),
    );
  }

    //测试接口是否调通
  void _getBackInfo(BuildContext context) async {
    await Provide.value<DetailsInfoProvide>(context).getGoodsInfo(goodsId);
  }
}
import 'package:flutter/material.dart';
import 'package:provide/provide.dart';
import 'package:flutter_shop/provide/details_info.dart';

//商品详情页
class DetailsPage extends StatelessWidget {
  final String goodsId;

  DetailsPage(this.goodsId);

  @override
  Widget build(BuildContext context) {
    return Scaffold(
      appBar: AppBar(
          //通过leading设置返回按钮
        leading: IconButton(
            icon: Icon(Icons.arrow_back),
            onPressed: () {
              Navigator.pop(context);
            }),
        title: Text('商品详细页'),
      ),
      body: FutureBuilder(
        future: _getBackInfo(context),
        builder: (context, snapshot) {
          //snapshot是用来判断是否含有返回值的
          if (snapshot.hasData) {
            return Container(
              child: Column(
                children: <Widget>[],
              ),
            );
          } else {
            return Center(
              child: Text('加载中...'),
            );
          }
        },
      ),
    );
  }

  Future _getBackInfo(BuildContext context) async {
    await Provide.value<DetailsInfoProvide>(context).getGoodsInfo(goodsId);
      //由于使用了全局的状态管理这里Future的返回值就无影响了
    return '完成加载';
  }
}
给需要添加跳转的地方加入
Application.router.navigateTo(
                  context, '/detail?id=${swiperDataList[index]['goodsId']}');
缺少context的地方加入context参数
界面单独写成文件,然后引入使用

此时将文件分开
import 'package:flutter/material.dart';
import 'package:provide/provide.dart';
import 'package:flutter_shop/provide/details_info.dart';

//用于屏幕适配
import 'package:flutter_screenutil/flutter_screenutil.dart';

class DetailsTopArea extends StatelessWidget {
  @override
  Widget build(BuildContext context) {
    return Provide<DetailsInfoProvide>(builder: (context, child, val) {
      var goodsInfo = val.goodsInfo.data.goodInfo;
      if (goodsInfo != null) {
        return Container(
          color: Colors.white,
          child: Column(
            children: <Widget>[
              _goodsImage(goodsInfo.image1),
              _goodsName(goodsInfo.goodsName),
              _goodsNumber(goodsInfo.goodsSerialNumber),
              _goodsPrice(goodsInfo.presentPrice, goodsInfo.oriPrice),
            ],
          ),
        );
      } else {
        return Text('正在加载中');
      }
    });
  }

  //商品图图片控件
  Widget _goodsImage(String url) {
    return Image.network(
      url,
      width: ScreenUtil.getInstance().setWidth(740),
    );
  }

  //商品名称控件
  Widget _goodsName(String name) {
    return Container(
      width: ScreenUtil.getInstance().setWidth(740),
      padding: const EdgeInsets.only(left: 15.0),
      child: Text(
        name,
        style: TextStyle(fontSize: ScreenUtil.getInstance().setSp(30)),
      ),
    );
  }

  //商品编号
  Widget _goodsNumber(String number) {
    return Container(
      width: ScreenUtil.getInstance().setWidth(740),
      padding: const EdgeInsets.only(left: 15.0),
      margin: EdgeInsets.only(top: 8.0),
      child: Text(
        '编号:${number}',
        style: TextStyle(color: Colors.black26),
      ),
    );
  }

  //商品价格
  Widget _goodsPrice(double presentPrice, double oriPrice) {
    return Container(
      width: ScreenUtil.getInstance().setWidth(740),
      padding: const EdgeInsets.only(left: 15.0),
      margin: const EdgeInsets.only(top: 8.0),
      child: Row(
        children: <Widget>[
          Text(
            '¥${presentPrice}',
            style: TextStyle(
                color: Colors.pinkAccent,
                fontSize: ScreenUtil.getInstance().setSp(40)),
          ),
          Text(
            '市场价:¥${oriPrice}',
            style: TextStyle(
              color: Colors.black26,
              decoration: TextDecoration.lineThrough,
            ),
          )
        ],
      ),
    );
  }
}
首先将需要用的数据Provide化
bool isLeft = true;
  bool isRight = false;

  //自定义TabBar切换方法
  changeTabBarLeftOrRight(String changeState) {
    if (changeState == 'left') {
      isLeft = true;
      isRight = false;
    } else {
      isLeft = false;
      isRight = true;
    }
    notifyListeners();
  }
建立一个TabBar
import 'package:flutter/material.dart';
import 'package:provide/provide.dart';
import 'package:flutter_shop/provide/details_info.dart';
import 'package:flutter_screenutil/flutter_screenutil.dart';

class DetailsTabBar extends StatelessWidget {
  @override
  Widget build(BuildContext context) {
    return Provide<DetailsInfoProvide>(builder: (context, child, val) {
      return Container(
        margin: EdgeInsets.only(top: 15.0),
        child: Row(
          children: <Widget>[
            _myLeftTabBar(context, val.isLeft),
            _myRightTabBar(context, val.isRight),
          ],
        ),
      );
    });
  }

  //左侧TabBar
  Widget _myLeftTabBar(BuildContext context, bool isLeft) {
    return InkWell(
      onTap: () {
        Provide.value<DetailsInfoProvide>(context)
            .changeTabBarLeftOrRight('left');
      },
      child: Container(
        width: ScreenUtil.getInstance().setWidth(375),
        alignment: Alignment.center,
        padding: EdgeInsets.all(10.0),
        decoration: BoxDecoration(
          border: Border(
            bottom: BorderSide(
              color: isLeft ? Colors.pinkAccent : Colors.black,
              width: 1.0,
            ),
          ),
        ),
        child: Text(
          '详情',
          style: TextStyle(color: isLeft ? Colors.pinkAccent : Colors.black),
        ),
      ),
    );
  }

  //右侧TabBar
  Widget _myRightTabBar(BuildContext context, bool isRight) {
    return InkWell(
      onTap: () {
        Provide.value<DetailsInfoProvide>(context)
            .changeTabBarLeftOrRight('right');
      },
      child: Container(
        width: ScreenUtil.getInstance().setWidth(375),
        alignment: Alignment.center,
        padding: EdgeInsets.all(10.0),
        decoration: BoxDecoration(
          border: Border(
            bottom: BorderSide(
              color: isRight ? Colors.pinkAccent : Colors.black,
              width: 1.0,
            ),
          ),
        ),
        child: Text(
          '评论',
          style: TextStyle(color: isRight ? Colors.pinkAccent : Colors.black),
        ),
      ),
    );
  }
}
引入使用可得如下效果:

项目地址:https://github.com/Sub6Resources/flutter_html
当前不支持视频
引入
#用于解析html
  flutter_html: ^0.9.6

import 'package:flutter_html/flutter_html.dart';
使用注意是data接收数据不是child
class DetailsWeb extends StatelessWidget {
  @override
  Widget build(BuildContext context) {
    var goodsDetail = Provide.value<DetailsInfoProvide>(context)
        .goodsInfo
        .data
        .goodInfo
        .goodsDetail;

    return Container(
      child: Html(
        data: goodsDetail,
      ),
    );
  }
}
参考:https://www.jianshu.com/p/f94ee876afa6
android/app/src/main/res/mipmap-xhdpi/ 目录下添加闪屏图片;android/app/src/main/res/drawable/launch_background.xml 文件,这个文件就是闪屏的背景文件,具体如何设置可以查阅 Android Drawable,我在 demo 中的设置如下:<?xml version="1.0" encoding="utf-8"?>
<!-- Modify this file to customize your launch splash screen -->
<layer-list xmlns:android="http://schemas.android.com/apk/res/android">
<item android:drawable="@android:color/background_dark" />
<!-- You can insert your own image assets here -->
<item
android:bottom="84dp">
<bitmap
android:gravity="center"
android:src="@mipmap/launch_image" />
</item>
</layer-list>
在build中增加一个判断完成不同项目的切换
import 'package:flutter/material.dart';
import 'package:flutter_shop/provide/details_info.dart';
import 'package:provide/provide.dart';
import 'package:flutter_screenutil/flutter_screenutil.dart';
import 'package:flutter_html/flutter_html.dart';

class DetailsWeb extends StatelessWidget {
  @override
  Widget build(BuildContext context) {
    var goodsDetail = Provide.value<DetailsInfoProvide>(context)
        .goodsInfo
        .data
        .goodInfo
        .goodsDetail;

    return Provide<DetailsInfoProvide>(builder: (context, child, val) {
      bool isLeft = val.isLeft;
      if (isLeft) {
        return Container(
          child: Html(data: goodsDetail),
        );
      } else {
        return Container(
          width: ScreenUtil.getInstance().setWidth(750),
          alignment: Alignment.center,
          padding: EdgeInsets.all(10.0),
          child: Text('暂时无数据'),
        );
      }
    });
  }
}

使用Stack布局在原有布局的基础上外部使用Stack布局通过Possition组件来定位底部的工具栏
@override
  Widget build(BuildContext context) {
    return Scaffold(
      appBar: AppBar(
        leading: IconButton(
            icon: Icon(Icons.arrow_back),
            onPressed: () {
              Navigator.pop(context);
            }),
        title: Text('商品详细页'),
      ),
      body: FutureBuilder(
        future: _getBackInfo(context),
        builder: (context, snapshot) {
          //snapshot是用来判断是否含有返回值的
          if (snapshot.hasData) {
            return Stack(//加入Stack
              children: <Widget>[
                Container(
                  child: ListView(
                    children: <Widget>[
                      DetailsTopArea(),
                      DetailsExplain(),
                      DetailsTabBar(),
                      DetailsWeb(),
                    ],
                  ),
                ),
                Positioned(//位置定位
                  bottom: 0,
                  left: 0,
                  child: DetailsBottom(),
                ),
              ],
            );
          } else {
            return Center(
              child: Text('加载中...'),
            );
          }
        },
      ),
    );
  }
Flutter中的持久化工具
链接:https://github.com/flutter/plugins/tree/master/packages/shared_preferences
一下是一个使用demo由于作为演示demo并未进行provide化
import 'package:flutter/material.dart';
import 'package:shared_preferences/shared_preferences.dart';

class CartPage extends StatefulWidget {
  @override
  _CartPageState createState() => _CartPageState();
}

class _CartPageState extends State<CartPage> {
  List<String> testList = [];

  @override
  Widget build(BuildContext context) {
    _show();
    return Container(
      child: Column(
        children: <Widget>[
          Container(
            height: 500.0,
            child: ListView.builder(
              itemCount: testList.length,
              itemBuilder: (context, index) {
                return ListTile(
                  title: Text(testList[index]),
                );
              },
            ),
          ),
          RaisedButton(
            onPressed: () {
              _add();
            },
            child: Text('增加'),
          ),RaisedButton(
            onPressed: () {
              _clear();
            },
            child: Text('清除'),
          ),
        ],
      ),
    );
  }

  void _add() async {
    SharedPreferences prefs = await SharedPreferences.getInstance();
    String addMessage = '测试SharedPreferences';
    setState(() {
      testList.add(addMessage);
    });
    await prefs.setStringList('testInfo', testList);
  }

  void _show() async {
    SharedPreferences prefs = await SharedPreferences.getInstance();
    if (prefs.getStringList('testInfo') != null) {
      setState(() {
        testList = prefs.getStringList('testInfo');
      });
    }
  }

  void _clear() async {
    SharedPreferences prefs = await SharedPreferences.getInstance();
    prefs.remove('testInfo');
    if (testList != null) {
      setState(() {
        testList = [];
      });
    }
  }
}
import 'package:flutter/material.dart';
import 'package:shared_preferences/shared_preferences.dart';
import 'dart:convert';

///思路:
///由于SharedPreference无法存储map数组因此将map数组变成string存储
///取出时将String转换为map数组使用
class CartProvide with ChangeNotifier {
  String cartString = '[]';

    ///商品加入方法
  save(goodsId, goodsName, count, price, images) async {
    SharedPreferences sharedPreferences = await SharedPreferences.getInstance();
    //取出String
    cartString = sharedPreferences.get('cartInfo');
    //将string装换为map数组
    var temp = cartString == null ? [] : json.decode(cartString.toString());
    //强制转换为map数组
    List<Map> tempList = List<Map>.from(temp);
    //标志这个商品在购物车中是否已经存在
    bool isHave = false;
    /*遍历寻找是否已经存在该商品存在则直接count++
    第一种forEach遍历
    tempList.forEach((item) {
      if (item['goodsId'] == goodsId) {
        item['count']++;
        isHave = true;
      }
    });
    */
     //第二种遍历方法找到对应id就退出循环效率更高
    for (var item in tempList) {
      if (item['goodsId'] == goodsId) {
        item['count']++;
        isHave = true;
        break;
      }
    }

    //如果不存在则加入
    if (!isHave) {
      tempList.add({
        'goodsId': goodsId,
        'goodsName': goodsName,
        'count': count,
        'price': price,
        'images': images
      });
    }

    //将map数组变成字符串
    cartString = json.encode(tempList).toString();
    print(cartString);
    sharedPreferences.setString('cartInfo', cartString);
    notifyListeners();
  }

    ///商品购买方法(这里目前使用清空代表)
  remove() async {
    SharedPreferences sharedPreferences = await SharedPreferences.getInstance();
    sharedPreferences.remove('cartInfo');
    print('-----清空完成------');
    notifyListeners();
  }
}
调用
这里采用异步为了之后如果需要加复杂操作也不会出问题
onTap: () async {
     await Provide.value<CartProvide>(context)
              .save(goodsId, goodsName, count, price, images);
},
class CartInfoModel {
  String goodsId;
  String goodsName;
  int count;
  double price;
  String images;

  CartInfoModel(
      {this.goodsId, this.goodsName, this.count, this.price, this.images});

  CartInfoModel.fromJson(Map<String, dynamic> json) {
    goodsId = json['goodsId'];
    goodsName = json['goodsName'];
    count = json['count'];
    price = json['price'];
    images = json['images'];
  }

  Map<String, dynamic> toJson() {
    final Map<String, dynamic> data = new Map<String, dynamic>();
    data['goodsId'] = this.goodsId;
    data['goodsName'] = this.goodsName;
    data['count'] = this.count;
    data['price'] = this.price;
    data['images'] = this.images;
    return data;
  }
}
加入数据修改数据时同时修改模型
取出数据时通过获取String然后转换为List<Map>之后再加入到cartList
import 'package:flutter/material.dart';
import 'package:shared_preferences/shared_preferences.dart';
import 'dart:convert';
import 'package:flutter_shop/model/cartInfo.dart';

///思路:
///由于SharedPreference无法存储map数组因此将map数组变成string存储
///取出时将String转换为map数组使用
class CartProvide with ChangeNotifier {
  String cartString = '[]';
  List<CartInfoModel> cartList = [];

  save(goodsId, goodsName, count, price, images) async {
    SharedPreferences sharedPreferences = await SharedPreferences.getInstance();
    //取出String
    cartString = sharedPreferences.get('cartInfo');
    //将string装换为map数组
    var temp = cartString == null ? [] : json.decode(cartString.toString());
    //强制转换为map数组
    List<Map> tempList = List<Map>.from(temp);
    //标志这个商品在购物车中是否已经存在
    bool isHave = false;
    /*
    tempList.forEach((item) {
      if (item['goodsId'] == goodsId) {
        item['count']++;
        isHave = true;
      }
    });
    */
    //第二种遍历方法找到对应id就退出循环效率更高
    for (int index = 0; index < tempList.length; index++) {
      if (tempList[index]['goodsId'] == goodsId) {
        tempList[index]['count']++;
        cartList[index].count++;
        isHave = true;
        break;
      }
    }
    //如果不存在则加入
    if (!isHave) {
      Map<String, dynamic> newGoods = {
        'goodsId': goodsId,
        'goodsName': goodsName,
        'count': count,
        'price': price,
        'images': images
      };
      tempList.add(newGoods);

      cartList.add(CartInfoModel.fromJson(newGoods));
    }

    //将map数组变成字符串
    cartString = json.encode(tempList).toString();
    print('字符串》》》》》》》》》${cartString}');
    print('数据模型》》》》》》》》》${cartList.toString()}');
    sharedPreferences.setString('cartInfo', cartString);
    notifyListeners();
  }

  remove() async {
    SharedPreferences sharedPreferences = await SharedPreferences.getInstance();
    sharedPreferences.remove('cartInfo');
    cartList.clear();
    print('-----清空完成------');
    notifyListeners();
  }

  //获取商品信息
  getCartInfo() async {
    SharedPreferences sharedPreferences = await SharedPreferences.getInstance();
    //取出数据
    cartString = sharedPreferences.get('cartInfo');
    //先清空数据
    cartList.clear();
    //数据不为空的时候
    if (cartString != null) {
      //将数据取出成List<Map>
      List<Map> tempList = List<Map>.from(json.decode(cartString.toString()));
      tempList.forEach((item) {
        cartList.add(CartInfoModel.fromJson(item));
      });
    }
    notifyListeners();
  }
}
通过Future获取到数据然后显示在布局上(测试显示结果即可)
import 'package:flutter/material.dart';
import 'package:provide/provide.dart';
import 'package:flutter_shop/provide/cart.dart';
import 'package:flutter_shop/model/cartInfo.dart';

class CartPage extends StatelessWidget {
  @override
  Widget build(BuildContext context) {
    return Scaffold(
      appBar: AppBar(
        title: Text('购物车'),
      ),
      body: FutureBuilder(
        future: _getCartInfo(context),
        builder: (context, snapshot) {
          //有数据则处理
          if (snapshot.hasData) {
            //获取cartList购物车列表
            List<CartInfoModel> cartList =
                Provide.value<CartProvide>(context).cartList;
            return ListView.builder(
              itemCount: cartList.length,
              itemBuilder: (context, index) {
                return ListTile(
                  title: Text('${cartList[index].goodsName}'),
                );
              },
            );
          } else {
            //无数据则返回加载中
            return Text('正在加载中.....');
          }
        },
      ),
    );
  }

  Future<String> _getCartInfo(BuildContext context) async {
    await Provide.value<CartProvide>(context).getCartInfo();
    return 'end';
  }
}
重新创建一个文件夹来放置购物车的页面设置
import 'package:flutter/material.dart';
import 'package:flutter_screenutil/flutter_screenutil.dart';
import 'package:flutter_shop/model/cartInfo.dart';

class CartItem extends StatelessWidget {
  final CartInfoModel cartItem;

  const CartItem({Key key, this.cartItem}) : super(key: key);

  @override
  Widget build(BuildContext context) {
    return Container(
      margin: const EdgeInsets.fromLTRB(5.0, 2.0, 5.0, 2.0),
      padding: const EdgeInsets.fromLTRB(5.0, 10.0, 5.0, 10.0),
      decoration: BoxDecoration(
        border: Border(
          bottom: BorderSide(
            width: 1.0,
            color: Colors.black12,
          ),
        ),
      ),
      child: Row(
        children: <Widget>[
          _cartCheckButton(),
          _cartImage(),
          _cartName(),
          _cartPrice()
        ],
      ),
    );
  }

  //选择商品的按钮
  Widget _cartCheckButton() {
    return Container(
      alignment: Alignment.center,
      child: Checkbox(
        value: true,
        activeColor: Colors.pinkAccent,
        onChanged: (bool) {

        },
      ),
    );
  }

  //商品图片
  Widget _cartImage() {
    return Container(
      width: ScreenUtil.getInstance().setWidth(150),
      height: ScreenUtil.getInstance().setHeight(150),
      padding: const EdgeInsets.all(3.0),
      decoration: BoxDecoration(
        border: Border.all(width: 1, color: Colors.black12),
      ),
      child: Image.network(cartItem.images),
    );
  }

  //商品名称
  Widget _cartName() {
    return Container(
      width: ScreenUtil.getInstance().setWidth(300),
      padding: const EdgeInsets.all(10.0),
      alignment: Alignment.topLeft,
      child: Column(
        children: <Widget>[
          Text(cartItem.goodsName),
        ],
      ),
    );
  }

  //商品价格
  Widget _cartPrice() {
    return Container(
      width: ScreenUtil.getInstance().setWidth(150),
      alignment: Alignment.centerRight,
      child: Column(
        children: <Widget>[
          Text('¥${cartItem.price}'),
          Container(
            child: InkWell(
              child: Icon(
                Icons.delete_forever,
                color: Colors.black26,
                size: 30,
              ),
            ),
          ),
        ],
      ),
    );
  }
}
import 'package:flutter/material.dart';

class IndexPageProvide with ChangeNotifier {
  int currentIndex=0;

  setCurrentIndex(int currentIndex) {
    this.currentIndex = currentIndex;
    notifyListeners();
  }
}
 @override
  Widget build(BuildContext context) {
    //设置适配尺寸 (填入设计稿中设备的屏幕尺寸) 假如设计稿是按iPhone6的尺寸设计的(iPhone6 750*1334)在这里全局适配
    ScreenUtil.instance = ScreenUtil(width: 750, height: 1334)..init(context);
    return Provide<IndexPageProvide>(builder: (context, child, indexProvide) {
      return Scaffold(
        backgroundColor: Color.fromRGBO(244, 245, 245, 1.0),
        bottomNavigationBar: BottomNavigationBar(
          type: BottomNavigationBarType.fixed,
          currentIndex: indexProvide.currentIndex,
          items: bottomTabs,
          onTap: (index) {
            indexProvide.setCurrentIndex(index);
          },
        ),
        body: IndexedStack(
          index: indexProvide.currentIndex,
          children: tabBodies,
        ),
      );
    });
  }
onTap: () {
        Provide.value<IndexPageProvide>(context).setCurrentIndex(1);
        print('点击了导航图标');
},
将一个底部UI进行拆分,拆分成简单的嵌套少的Widget
import 'package:flutter/material.dart';
import 'package:flutter_screenutil/flutter_screenutil.dart';

class CartBottom extends StatelessWidget {
  @override
  Widget build(BuildContext context) {
    return Container(
      padding: const EdgeInsets.all(5.0),
      color: Colors.white,
      child: Row(
        children: <Widget>[
          _selectAllButton(),
          _totalPrice(),
          _goButton(),
        ],
      ),
    );
  }

  //全选按钮
  Widget _selectAllButton() {
    return Row(
      children: <Widget>[
        Checkbox(
          value: true,
          activeColor: Colors.pink,
          onChanged: (bool val) {},
        ),
        Text('全选'),
      ],
    );
  }

  //总计
  Widget _totalPrice() {
    return Container(
      width: ScreenUtil.getInstance().setWidth(430),
      child: Column(
        children: <Widget>[
          Row(
            children: <Widget>[
              Container(
                alignment: Alignment.centerRight,
                width: ScreenUtil.getInstance().setWidth(280),
                child: Text(
                  '合计',
                  style: TextStyle(
                    fontSize: ScreenUtil.getInstance().setSp(36),
                  ),
                ),
              ),
              Container(
                alignment: Alignment.centerLeft,
                width: ScreenUtil.getInstance().setWidth(150),
                child: Text(
                  '¥1992',
                  style: TextStyle(
                    color: Colors.pink,
                    fontSize: ScreenUtil.getInstance().setSp(36),
                  ),
                ),
              )
            ],
          ),
          Container(
            width: ScreenUtil.getInstance().setWidth(430),
            alignment: Alignment.centerRight,
            child: Text(
              '满10元免配送费,预购免配送费',
              style: TextStyle(
                  color: Colors.black38,
                  fontSize: ScreenUtil.getInstance().setSp(22)),
            ),
          ),
        ],
      ),
    );
  }

  //结算组件
  Widget _goButton() {
    return Container(
      width: ScreenUtil.getInstance().setWidth(170),
      padding: const EdgeInsets.only(left: 10),
      child: InkWell(
        onTap: () {},
        child: Container(
          padding: const EdgeInsets.fromLTRB(5.0, 10.0, 5.0, 10.0),
          alignment: Alignment.center,
          decoration: BoxDecoration(
            color: Colors.pink,
            borderRadius: BorderRadius.all(Radius.circular(10.0)),
          ),
          child: Text(
            '结算(6)',
            style: TextStyle(color: Colors.white),
          ),
        ),
      ),
    );
  }
}
目前是UI制作部分数据并未使用Provide化的数据
import 'package:flutter/material.dart';
import 'package:flutter_screenutil/flutter_screenutil.dart';

class CartCount extends StatelessWidget {
  @override
  Widget build(BuildContext context) {
    return Container(
      width: ScreenUtil.getInstance().setWidth(165),
      margin: const EdgeInsets.only(top: 5.0),
      decoration: BoxDecoration(
        border: Border.all(width: 1.0, color: Colors.black12),
      ),
      child: Row(
        children: <Widget>[
          _reduceButton(),
          _countArea(),
          _addButton(),
        ],
      ),
    );
  }

  //减少按钮
  Widget _reduceButton() {
    return InkWell(
      onTap: () {},
      child: Container(
        width: ScreenUtil.getInstance().setWidth(45),
        height: ScreenUtil.getInstance().setHeight(45),
        alignment: Alignment.center,
        decoration: BoxDecoration(
            color: Colors.white,
            border: Border(
              right: BorderSide(width: 1.0, color: Colors.black12),
            )),
        child: Icon(Icons.remove),
      ),
    );
  }

  //加号按钮
  Widget _addButton() {
    return InkWell(
      onTap: () {},
      child: Container(
        width: ScreenUtil.getInstance().setWidth(45),
        height: ScreenUtil.getInstance().setHeight(45),
        alignment: Alignment.center,
        decoration: BoxDecoration(
            color: Colors.white,
            border: Border(
              left: BorderSide(width: 1.0, color: Colors.black12),
            )),
        child: Icon(Icons.add),
      ),
    );
  }

  //数量显示区域
  Widget _countArea() {
    return Container(
      width: ScreenUtil.getInstance().setWidth(70),
      height: ScreenUtil.getInstance().setHeight(45),
      alignment: Alignment.center,
      color: Colors.white,
      child: Text(''),
    );
  }
}
class CartInfoModel {
  String goodsId;
  String goodsName;
  int count;
  double price;
  String images;
  bool isCheck;//增加

  CartInfoModel(
      {this.goodsId,
      this.goodsName,
      this.count,
      this.price,
      this.images,
      this.isCheck});//增加

  CartInfoModel.fromJson(Map<String, dynamic> json) {
    goodsId = json['goodsId'];
    goodsName = json['goodsName'];
    count = json['count'];
    price = json['price'];
    images = json['images'];
    isCheck = json['isCheck'];//增加
  }

  Map<String, dynamic> toJson() {
    final Map<String, dynamic> data = new Map<String, dynamic>();
    data['goodsId'] = this.goodsId;
    data['goodsName'] = this.goodsName;
    data['count'] = this.count;
    data['price'] = this.price;
    data['images'] = this.images;
    data['isCheck'] = this.isCheck;//增加
    return data;
  }
}
在cart的Provide中增加删除方法
 //删除单个购物车商品
  deleteOneGoods(String goodsId) async {
    SharedPreferences sharedPreferences = await SharedPreferences.getInstance();
    cartString = sharedPreferences.getString('cartInfo');
    List<Map> tempList = List<Map>.from(json.decode(cartString));

    //遍历寻找是要删除的goodsId所在的下标
    int deleteIndex = 0;
    for (int index = 0; index < tempList.length; index++) {
      if (tempList[index]['goodsId'] == goodsId) {
        deleteIndex = index;
        break;
      }
    }
    tempList.removeAt(deleteIndex);
    //重新持久化
    cartString = json.encode(tempList).toString();
    sharedPreferences.setString('cartInfo', cartString);
    //重新获取数据
    getCartInfo();
  }
小坑:为了列表能够及时响应商品删除的刷新需要在ListView外部套上Provide
Provide<CartProvide>(
     builder: (context, child, cartInfo) {
       cartList = cartInfo.cartList;
       return ListView.builder(
            itemCount: cartList.length,
            itemBuilder: (context, index) {
                 return CartItem(cartItem: cartList[index]);
            },
        );
     },
 ),
在cart的Provide中增加数量和价格的数据
然后在cart_bottom中使用Provide更新,同样需要使用Provide嵌套监听改变
在cart中增加方法
商品选中按钮方法:
  //改变选中按钮的状态
  changeCheckBox(String goodsId) async {
    SharedPreferences sharedPreferences = await SharedPreferences.getInstance();
    cartString = sharedPreferences.getString('cartInfo');
    List<Map> tempList = List<Map>.from(json.decode(cartString));
    //遍历当前点击的item
    for (int index = 0; index < tempList.length; index++) {
      if (tempList[index]['goodsId'] == goodsId) {
        tempList[index]['isCheck'] = !tempList[index]['isCheck'];
        break;
      }
    }
    //重新持久化
    cartString = json.encode(tempList).toString();
    sharedPreferences.setString('cartInfo', cartString);
    //重新获取数据
    await getCartInfo();
  }
全选按钮方法:
在Provide中增加isAllCheck=true的变量;
然后在获取商品列表方法中进行修改以达到全选按钮和上方商品选中按钮同步的效果
bool isAllCheck=true;

getCartInfo() async {
    SharedPreferences sharedPreferences = await SharedPreferences.getInstance();
    //取出数据
    cartString = sharedPreferences.get('cartInfo');
    //先清空数据
    cartList.clear();
    //数据不为空的时候
    if (cartString != null) {
      //将数据取出成List<Map>
      List<Map> tempList = List<Map>.from(json.decode(cartString.toString()));

      //每次初始化为0
      totalPrice = 0;
      totalGoodsCount = 0;

      //全选状态每次或得列表时初始化
      isAllCheck = true;

      tempList.forEach((item) {
        if (item['isCheck']) {
          totalPrice += (item['price'] * item['count']);
          totalGoodsCount += item['count'];
        } else {
          isAllCheck = false;
        }
        cartList.add(CartInfoModel.fromJson(item));
      });
    }
    notifyListeners();
  }
全选按钮点击效果实现方法
第一种写法
//全选按钮效果的实现
  changeAllCheckSate() async {
      SharedPreferences sharedPreferences =
          await SharedPreferences.getInstance();
      cartString = sharedPreferences.getString('cartInfo');
      List<Map> tempList = List<Map>.from(json.decode(cartString));
      //遍历当前点击的item
      for (int index = 0; index < tempList.length; index++) {
          tempList[index]['isCheck'] = !isAllCheck;
      }
       //重新持久化
      cartString = json.encode(tempList).toString();
      sharedPreferences.setString('cartInfo', cartString);
      //重新获取数据
      await getCartInfo();
  }
第二种写法
//全选按钮效果的实现
  changeAllCheckSate(bool isCheck) async {
    SharedPreferences sharedPreferences = await SharedPreferences.getInstance();
    cartString = sharedPreferences.getString('cartInfo');
    List<Map> tempList = List<Map>.from(json.decode(cartString));
    //遍历当前点击的item
    for (int index = 0; index < tempList.length; index++) {
      tempList[index]['isCheck'] = isCheck;
    }
    //重新持久化
    cartString = json.encode(tempList).toString();
    sharedPreferences.setString('cartInfo', cartString);
    //重新获取数据
    await getCartInfo();
  }
方法:
//商品加减方法
  addOrReduce(String goodsId, String todo) async {
    SharedPreferences sharedPreferences = await SharedPreferences.getInstance();
    cartString = sharedPreferences.getString('cartInfo');
    List<Map> tempList = List<Map>.from(json.decode(cartString));
    //记录操作项的下标
    int addOrReduceIndex = 0;
    for (int index = 0; index < tempList.length; index++) {
      if (tempList[index]['goodsId'] == goodsId) {
        addOrReduceIndex = index;
        break;
      }
    }

    if (todo == 'add') {
      tempList[addOrReduceIndex]['count']++;
    } else if (tempList[addOrReduceIndex]['count'] > 1) {
      tempList[addOrReduceIndex]['count']--;
    }

    //重新持久化
    cartString = json.encode(tempList).toString();
    sharedPreferences.setString('cartInfo', cartString);
    //重新获取数据
    await getCartInfo();
  }
UI上的一些交互逻辑:
减少按钮在数量减到1时显示灰色
//减少按钮
  Widget _reduceButton(context) {
    return InkWell(
      onTap: () {
        Provide.value<CartProvide>(context)
            .addOrReduce(cartItem.goodsId, 'reduce');
      },
      child: Container(
        width: ScreenUtil.getInstance().setWidth(45),
        height: ScreenUtil.getInstance().setHeight(45),
        alignment: Alignment.center,
        decoration: BoxDecoration(
            color: cartItem.count == 1 ? Colors.black12 : Colors.white,
            border: Border(
              right: BorderSide(width: 1.0, color: Colors.black12),
            )),
        child: cartItem.count == 1 ? Text('') : Text('-'),
      ),
    );
  }
首先吧首页Provide化
然后修改一下购物车点击的方法
Provide.value<IndexPageProvide>(context).setCurrentIndex(2);
Navigator.pop(context);
通过Stack层叠实现数量显示
购物车层叠显示数量:

Stack(
    children: <Widget>[
      InkWell(
        onTap: () {
          Provide.value<IndexPageProvide>(context).setCurrentIndex(2);
          Navigator.pop(context);
        },
        child: Container(
          alignment: Alignment.center,
          width: ScreenUtil.getInstance().setWidth(110),
          child: Icon(
            Icons.shopping_cart,
            size: 35,
            color: Colors.pinkAccent,
          ),
        ),
      ),
        //因为需要动态显示所以使用Provide化
      Provide<CartProvide>(
        builder: (context, child, cartInfo) {
          String totalGoodsCount = cartInfo.totalGoodsCount.toString();
          return Positioned(
            right: 10,
            top: 0,
            child: Container(
              padding: const EdgeInsets.fromLTRB(6, 3, 6, 3),
              decoration: BoxDecoration(
                color: Colors.pink,
                border: Border.all(color: Colors.white, width: 2.0),
                borderRadius: BorderRadius.all(Radius.circular(12.0)),
              ),
              child: Text(
                totalGoodsCount,
                style: TextStyle(
                  color: Colors.white,
                  fontSize: ScreenUtil.getInstance().setSp(22),
                ),
              ),
            ),
          );
        },
      )
    ],
  ),
点击购买需要能够正确显示:
改写save方法
 save(goodsId, goodsName, count, price, images) async {
    SharedPreferences sharedPreferences = await SharedPreferences.getInstance();
    //取出String
    cartString = sharedPreferences.get('cartInfo');
    //将string装换为map数组
    var temp = cartString == null ? [] : json.decode(cartString.toString());
    //强制转换为map数组
    List<Map> tempList = List<Map>.from(temp);
    //标志这个商品在购物车中是否已经存在
    bool isHave = false;
    /*
    tempList.forEach((item) {
      if (item['goodsId'] == goodsId) {
        item['count']++;
        isHave = true;
      }
    });
    */

    //为了点击购买时能够正确显示购物车商品数量
    totalPrice = 0;
    totalGoodsCount = 0;

    //第二种遍历方法找到对应id就退出循环效率更高后续为了处理购物车商品数量显进行修改
    for (int index = 0; index < tempList.length; index++) {
      if (tempList[index]['goodsId'] == goodsId) {
        tempList[index]['count']++;
        cartList[index].count++;
        isHave = true;
//        break;
      }
      if (cartList[index].isCheck) {
        totalPrice += cartList[index].price * cartList[index].count;
        totalGoodsCount += cartList[index].count;
      }
    }
    //如果不存在则加入
    if (!isHave) {
      Map<String, dynamic> newGoods = {
        'goodsId': goodsId,
        'goodsName': goodsName,
        'count': count,
        'price': price,
        'images': images,
        'isCheck': true
      };
      tempList.add(newGoods);

      cartList.add(CartInfoModel.fromJson(newGoods));

      totalPrice+=count*price;
      totalGoodsCount+=count;
    }

    //将map数组变成字符串
    cartString = json.encode(tempList).toString();
    sharedPreferences.setString('cartInfo', cartString);
    notifyListeners();
  }
增加购物车点击商品图片跳转到商品页
//商品图片
  Widget _cartImage(context) {
    return InkWell(
      onTap: () {
        Application.router.navigateTo(
          context,
          '/detail?id=${cartItem.goodsId}',
        );
      },
      child: Container(
        width: ScreenUtil.getInstance().setWidth(150),
        height: ScreenUtil.getInstance().setHeight(150),
        padding: const EdgeInsets.all(3.0),
        decoration: BoxDecoration(
          border: Border.all(width: 1, color: Colors.black12),
        ),
        child: Image.network(cartItem.images),
      ),
    );
  }
import 'package:flutter/material.dart';
import 'package:flutter_screenutil/flutter_screenutil.dart';

class MemberPage extends StatelessWidget {
  @override
  Widget build(BuildContext context) {
    return Scaffold(
      appBar: AppBar(
        title: Text('个人中心'),
      ),
      body: ListView(
        children: <Widget>[
          _topHeader(),
        ],
      ),
    );
  }

  Widget _topHeader() {
    return Container(
      width: ScreenUtil.getInstance().setWidth(750),
      padding: const EdgeInsets.all(20.0),
      color: Colors.pink,
      child: Column(
        children: <Widget>[
          Container(
            margin: const EdgeInsets.only(top: 30),
            child: ClipOval(
              child: FadeInImage.assetNetwork(
                width: ScreenUtil.getInstance().setWidth(200),
                fit: BoxFit.fitWidth,
                image:
                    'https://avatars2.githubusercontent.com/u/20411648?s=460&v=4',
                placeholder: 'images/avatar.png',
              ),
            ),
          ),
          Container(
            margin: const EdgeInsets.only(top: 10),
            child: Text(
              '用户名',
              style: TextStyle(
                color: Colors.black,
                fontSize: ScreenUtil.getInstance().setSp(36),
              ),
            ),
          ),
        ],
      ),
    );
  }
}
 //订单标题
  Widget _orderTitle() {
    return Container(
      margin: const EdgeInsets.only(top: 10),
      decoration: BoxDecoration(
        color: Colors.white,
        border: Border(
          bottom: BorderSide(
            color: Colors.black12,
            width: 1.0,
          ),
        ),
      ),
      child: ListTile(
        leading: Icon(Icons.list),
        title: Text('我的订单'),
        trailing: Icon(Icons.navigate_next),
      ),
    );
  }

  //订单的类型
  Widget _orderType() {
    return Container(
      margin: const EdgeInsets.only(top: 5),
      width: ScreenUtil.getInstance().setWidth(750),
      height: ScreenUtil.getInstance().setHeight(150),
      padding: const EdgeInsets.only(top: 20),
      color: Colors.white,
      child: Row(
        children: <Widget>[
          Container(
            width: ScreenUtil.getInstance().setWidth(187),
            child: Column(
              children: <Widget>[
                Icon(
                  Icons.payment,
                  size: 30,
                ),
                Text('待付款'),
              ],
            ),
          ),
          Container(
            width: ScreenUtil.getInstance().setWidth(187),
            child: Column(
              children: <Widget>[
                Icon(
                  Icons.query_builder,
                  size: 30,
                ),
                Text('待付款'),
              ],
            ),
          ),
          Container(
            width: ScreenUtil.getInstance().setWidth(187),
            child: Column(
              children: <Widget>[
                Icon(
                  Icons.directions_car,
                  size: 30,
                ),
                Text('待收货'),
              ],
            ),
          ),
          Container(
            width: ScreenUtil.getInstance().setWidth(187),
            child: Column(
              children: <Widget>[
                Icon(
                  Icons.message,
                  size: 30,
                ),
                Text('待评价'),
              ],
            ),
          ),
        ],
      ),
    );
  }
//通用ListTile
  Widget _myListTile(var leadIcon, String title) {
    return Container(
      decoration: BoxDecoration(
        color: Colors.white,
        border: Border(
          bottom: BorderSide(color: Colors.black12, width: 1.0),
        ),
      ),
      child: ListTile(
        leading: Icon(leadIcon),
        title: Text(title),
        trailing: Icon(Icons.navigate_next),
      ),
    );
  }

  //自定义组件组合
  Widget _combineMyListTile() {
    return Container(
      margin: const EdgeInsets.only(top: 10),
      child: Column(
        children: <Widget>[
          _myListTile(Icons.favorite_border, '领取优惠券'),
          _myListTile(Icons.favorite_border, '已领取优惠券'),
          _myListTile(Icons.location_on, '地址管理'),
          _myListTile(Icons.phone_in_talk, '客服电话'),
          _myListTile(Icons.info_outline, '关于商城'),
        ],
      ),
    );
  }
效果:

此处可能存在不合适展示的内容,页面不予展示。您可通过相关编辑功能自查并修改。
如您确认内容无涉及 不当用语 / 纯广告导流 / 暴力 / 低俗色情 / 侵权 / 盗版 / 虚假 / 无价值内容或违法国家有关法律法规的内容,可点击提交进行申诉,我们将尽快为您处理。


